All firm users requiring CosmoLex access must have a user account. Administrators have the option to fully activate new users from within User Management, including password setup.
Navigating to User Management
- From the left navigation panel, click Account.
- Atop the Account left navigation, click User Management.
Here you will find the User tab, where you can add, edit and delete users, as well as the Role tab, where you can add, edit and delete user roles. This area is only accessible to those who have proper permissions.
Add a User
To add a user:
- Click User tab
- From the toolbar, click Add.
The Add User screen opens.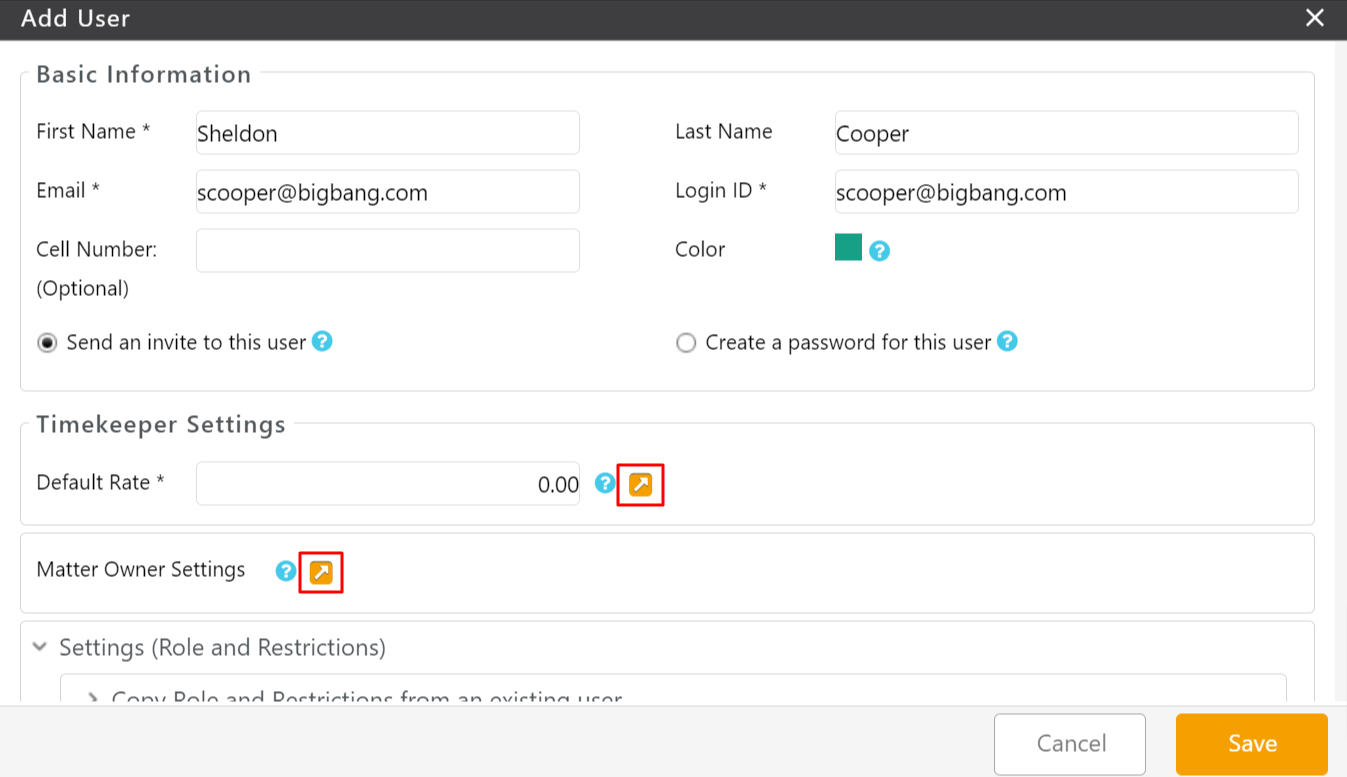
Basic Information
-
-
- Complete the First Name, Last Name, and email fields for the new user.
The Login ID field defaults to the user’s email address, but you can change it. - In the Cell Number field, enter a cell number if you have enabled the One-Time Passcode via SMS method in two-factor authentication at the firm level.
- In the Color field, click the box and then click the color you want to assign to the user for their calendar events.
- Click the appropriate radio button to:
- Send an invite to this user. Once the user is added, the system will send an email to the address provided requesting that they set up their password.
- Create a password for this user. Choosing this option allows you to fully activate this user account by creating a secure password for them. This password must meet the secure password requirements listed. You will then need to save the password and securely share it with the user. We provide a copy password function to help with this.
- In the Timekeeper Settings default rate field, you can add a default rate for the timekeeper. You can also manage the timekeeper by clicking on the Edit arrow, or do so after saving the user.
- You can choose to complete the Matter Owner Settings by clicking on the Edit arrow, or do so after saving the user.
- Complete the First Name, Last Name, and email fields for the new user.
-
Settings (Role & Restrictions)
Take the appropriate action:
-
-
-
- Copy Role and Restrictions from an existing user
- If it is easier to choose a role belonging to another user, click on this field, and you can select the user to copy the role from.
- Role
- You can confirm the role selected (default is Normal) or choose a different role from the drop-down list. If you would like to create a new role, you must first configure that role
- Copy Role and Restrictions from an existing user
-
-
If you have no additional restrictions to apply for this user, you can save at this time. You will be prompted to type in your CosmoLex password. If you have enabled two-factor authentication, enter the verification code sent either via SMS or via the Microsoft Authenticator App (depending on the method selected at firm level) to proceed.
If wanting to provide additional restrictions, see below.
Additional Restrictions
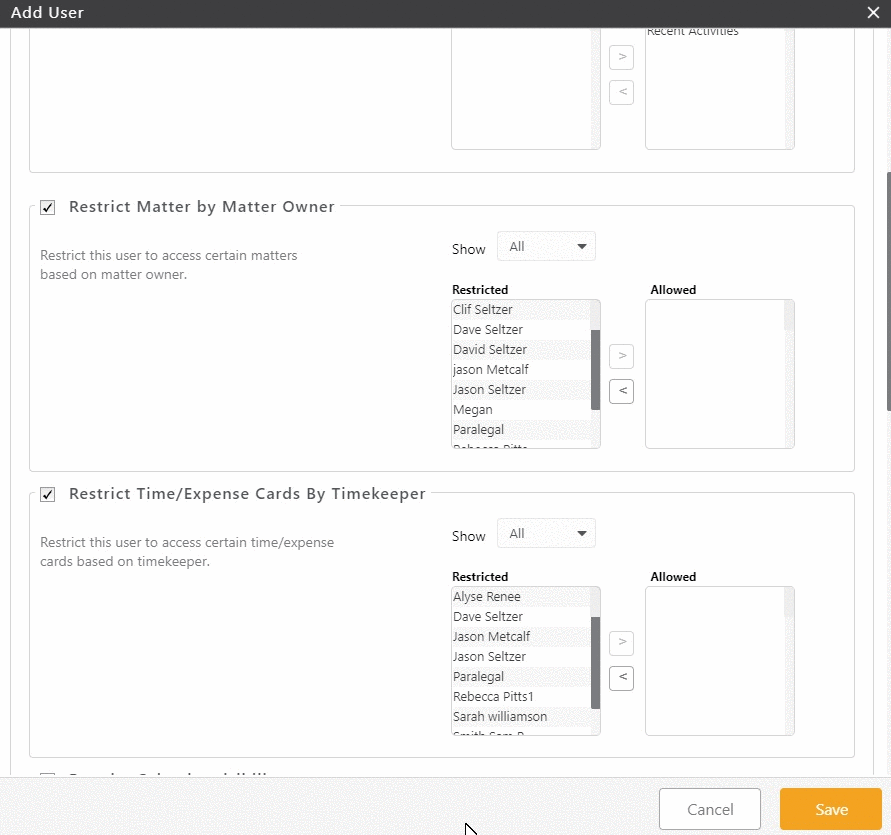
We understand that not every user (even if assigned the same role) should be able to access the same specific items within an allowed area. This section allows you to restrict specific data for this user only. Note: Administrator roles cannot have additional restrictions applied, we recommend instead assigning the ‘Normal’ role and applying any needed restrictions.
For areas, you do not wish to restrict further, leave the section as is (unchecked). For areas you do wish to restrict further, check the corresponding checkbox and a restricted/allowed list will populate. By default, all items will be restricted, until designated as allowed.
-
-
-
- Restrict Dashboard Visibility
- This controls the visibility of the Firm Dashboard, Me Dashboard, and Recent Activities.
- By default, only admins see the Firm Dashboard.
- Restrict Matter by Matter Owner
- Every matter is assigned a Matter Owner. This restriction will only make visible the matters assigned to allowed Matter Owners.
- Restrict Time/Expense Cards By Timekeeper
- Every entry is assigned a Timekeeper. This restriction will only make visible the entries assigned to allowed Timekeepers.
- Restrict Calendar Visibility
- When going to Activities > Calendar, this restriction will only list user calendars listed as allowed.
- Restrict Apps
- Restrict to which user-specific apps this user can connect.
- Restrict Email Visibility
- By default, all non-administrator users will only see their own inboxes under Activities > Email.
- You can use this setting to restrict/allow another user’s inboxes.
- Restrict Bank Visibility
- This restriction will block or allow visibility of bank accounts throughout the system for this user.
- Restrict Bank List Visibility
- If you wish to block the bank globally, but allow matter-related activity (assign trust bank to a matter, enter a hard cost, receive retainer/invoice payments), you can permit list visibility here. This will allow the bank account to display as an option when completing these actions, even if restricted on a global level.
- Restrict Report Visibility
- If a user has access to reports, they can see all reports unless restricted on this list.
- Restrict Global Section Visibility
- This restriction will block or allow users to view only selected items from Time/Expense, Invoice, Task, Note, or Chat, in the Global Activities section.
- Restrict user to view only Unbilled Time/Expense Cards
- Checking this restriction will restrict view of billed items.
- Restrict user to view their recent activities only
- Checking this restriction will filter the Recent Activities section in the Dashboard area to only display their activities.
- Restrict user to view their created tasks only
- Checking this restriction will restrict view of others tasks.
- Allow this user to manage other users’ events/tasks
- Checking this restriction will allow the editing of other user’s calendar.
- Ethical Wall Admin
- Checking this restriction will allow this user to view Ethical Wall Admin section.
- Restrict Dashboard Visibility
-
-
Once complete, in the bottom right corner, click Save. You will be prompted to type in your CosmoLex password. If you have enabled two-factor authentication, enter the verification code sent either via SMS or via the Microsoft Authenticator App (depending on the method selected at firm level) to proceed.
Reinvite a User
When you add a user by selecting Send an invite to this user, the system emails them a notification requesting they set up their password. If they do not set up their password within three days, their link expires. If their link expires, the Admin user can re-invite them to set their password.
To re-invite a user:
-
-
- From within User Management, click the User tab.
- Single-click the user to highlight them, and then from the toolbar, click Action > Reinvite.
The Reinvite User message box reads: Email was sent successfully. - Click OK.
-
Edit a User
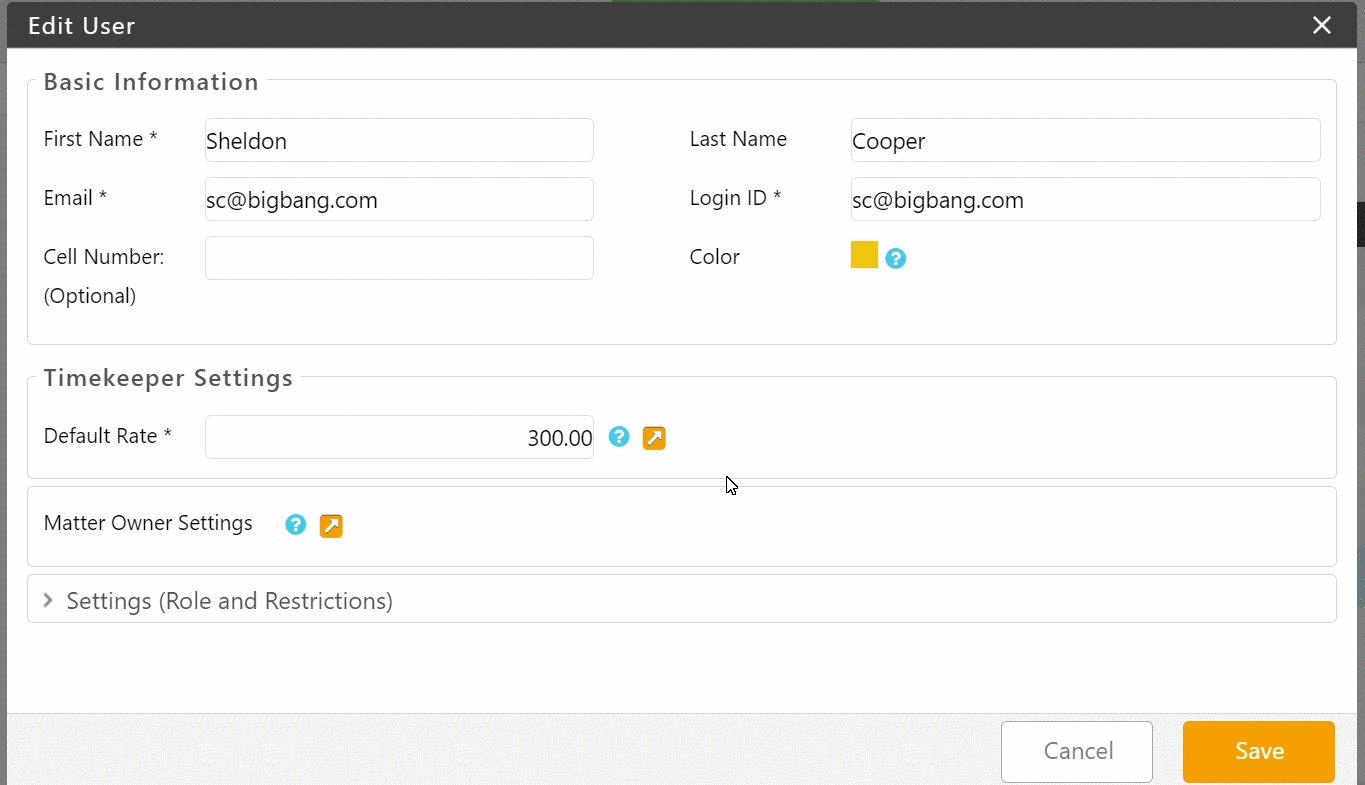
To edit a user:
-
-
- From within User Management, click the User tab.
- Double-click the user, or single-click them to highlight them, and then from the toolbar, click Edit.
- Make your changes to the user’s timekeeper/matter owner settings, permissions and restrictions as needed.
- In the lower right corner, click Save.
You will be prompted to type in your CosmoLex password. If you have enabled two-factor authentication, enter the verification code sent either via SMS or via the Microsoft Authenticator App (depending on the method selected at firm level) to proceed.
The system saves your changes.
-
Delete a User
To delete a user:
-
-
- From within User Management, click the User tab.
- Single-click the user to highlight them, and then from the toolbar, click Action > Delete User.
The Delete User message box reads: Are you sure you want to Delete selected User? - Click Yes.
- You will be prompted to type in your CosmoLex password. If you have enabled two-factor authentication, enter the verification code sent either via SMS or via the Microsoft Authenticator App (depending on the method selected at firm level) to proceed.
- Click Verify.
The system removes the user.
-