Matters are the software’s building blocks, allowing you to create timecards, expense cards, invoices, trust transactions, and use the software’s practice management tools.
Your matter options include:
- Add
- Edit
- Copy
- Delete
- Archive
Watch a Video
Add a Matter
To add a matter:
- From the left navigation panel, click Matters.
- From the toolbar atop the Matters screen, click Add.
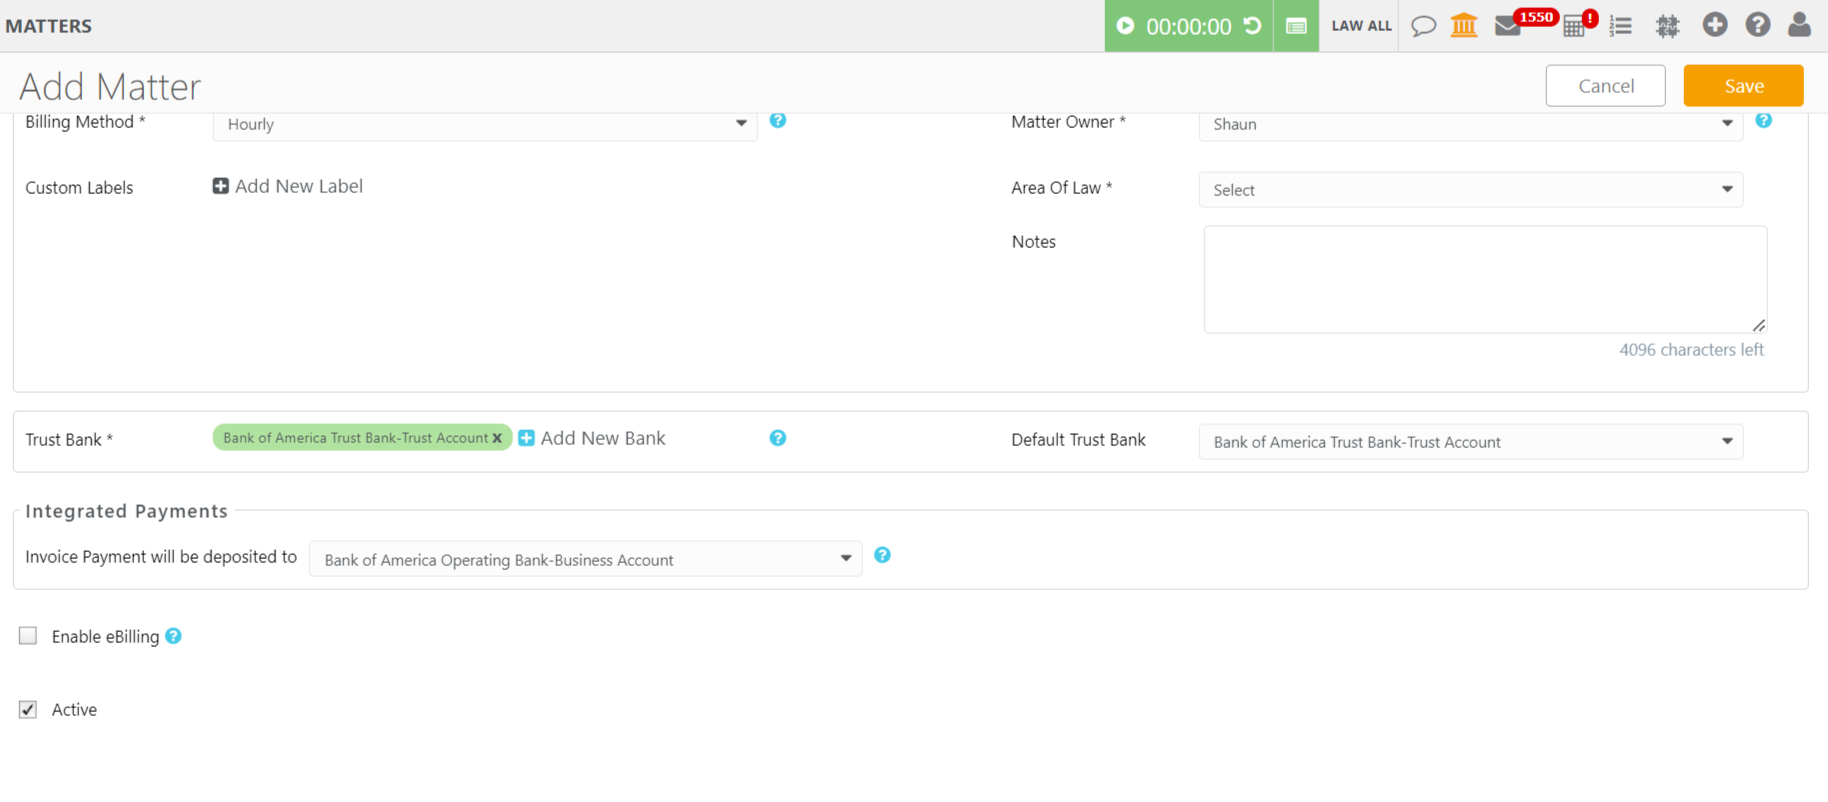
Add Matter Screen Fields
| Matter File # |
Enter an internal tracking number, if desired. The system can also auto-generate this field. |
| Date Opened | Defaults to today’s date. You can use the drop-down to click a different date. |
| Client |
Take the appropriate action:
|
| Matter Name | From the drop-down, click the matter name. You can also enter a new name or customize the list. |
| Billing Method |
From the drop-down, click the billing method. If you choose Fixed or Contingency, additional fields will display for fee entry. |
| Matter Owner |
From the drop-down, click the matter owner. |
| Custom Labels | Add a custom label if desired. |
| Area of Law | From the drop-down, click the area of law. This is a required field for Canadian firms. |
| Notes |
|
| Trust Bank | From the section’s Default Trust Bank field, use the drop-down to click your trust bank. You can also click Add New Bank to add a new trust bank. |
| Integrated Payments |
|
| Enable eBilling | If you wish to enable eBilling for this matter, check the box. Note that this checkbox will be disabled if you have not turned on the ebIlling settings within the setup section. |
| Active | Check the box to make the matter active. If at any point you wish to archive your matter, you can edit the matter, and uncheck this box, then save. That will move the matter to the inactive list within the system. |
In the upper right corner, click Save.
- You will be redirected to the Settings section with tabs atop the screen.
- Click on each tab to complete the remaining settings.
- If you have enabled the matter for eBilling, you will be redirected to the eBilling page.
Edit a Matter
To edit a matter:
- From the left navigation panel, click Matters.
- On the Matters screen, single-click the matter, and then from the toolbar, click Edit.
- At the bottom of the Matter’s left navigation, click Settings.
- From the tabs atop the Settings section, click Matter Info.
- On the Settings Matter Info screen, edit the fields as needed.
- In the upper right corner, click Save.
The system saves your updates.
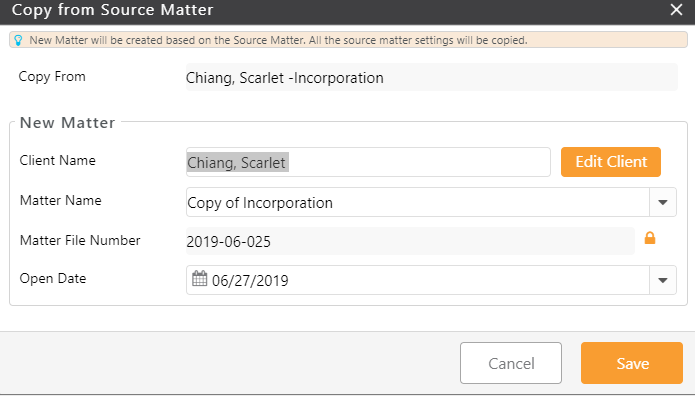
Copy a Matter
You can copy a matter’s information and settings into a new matter.
To copy a matter:
- From the left navigation panel, click Matters.
- On the Matters screen, single-click the matter to highlight it.
- From the toolbar, click Copy.
- On the Copy from Source Matter screen, click Edit Client to select a different client or to edit client information, if needed.
- From the Matter Name field’s drop-down, click the matter name or enter a new name.
- From the Open Date field’s drop-down, click the open date or leave the default to today’s date.
- Click Save.
Delete a Matter
To delete a matter:
- From the left navigation panel, click Matters.
- On the Matters screen, single-click the matter, and then from the toolbar, click Delete.
The Delete Matter message box reads: Are you sure you want to delete selected Matter? - Click Yes.
The system deletes the matter.
Archive a Matter
To archive a matter:
- Confirm you are not retaining funds for the matter. If the matter shows a trust balance, you must disburse all funds prior to archiving the matter.
- Accrual-based accounting clients must write-off accounts receivable/unpaid balances prior to archiving the matter.
- Single-click the matter to highlight it, and then from the toolbar, click Edit.
- On the Edit Matter screen, beneath the Advanced Settings section, uncheck the box beside Active.
- In the upper right corner, click Save.
The system moves the matter to Inactive status.