Watch a Video
Change or Write-Off an Invoice Balance
From Matters
- From the left navigation panel, click Matters.
- From the Matters screen, double-click the matter, or single-click the matter to highlight it, then click Details.
- From the Matters left navigation, click Billing.
- From the tabs atop the Billing Screen, click Invoice.
- Single-click your invoice to highlight it.
- From the toolbar, click Action > Change/Write-off Invoice.
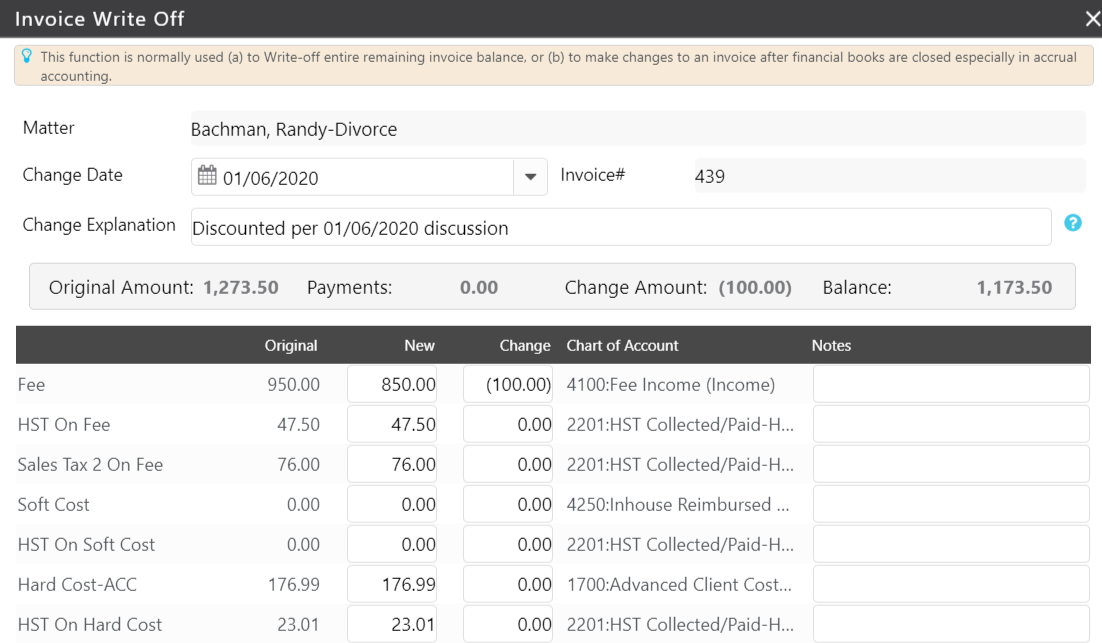
The Invoice Write Off screen opens, with the Matter field referencing the applicable matter. - From the Change Date drop-down, select the date of this change.
- In the Change Explanation field, enter the change description you want to display on the client’s invoice.
- Take the appropriate action:
- Write-off full remaining balance
- Check the box beside Write-off full remaining balance.
- Click Save.
The screen updates to display 0.00 Invoice Balance and a Paid status.
- Write-off full remaining balance
-
- Change
- In either the New or Change field for the applicable line items, enter your changes. For New, enter your updated total. For Change, enter the difference you want to apply as a negative amount.
The change column calculates and displays the line item adjustment amount and updates the invoice balance.
- In either the New or Change field for the applicable line items, enter your changes. For New, enter your updated total. For Change, enter the difference you want to apply as a negative amount.
- Change
-
-
- In the Notes field, you can enter internal notes that will display only on Change/Write-off reports.
- Click Save.
The Invoice Balance field displays the new total.
-
From Activities
To change or write-off your invoice balance:
- From the left navigation panel, click Activities.
- From the Activities left navigation, click Invoices.
- Single-click the invoice.
- From the toolbar, click Action > Change/Write-off Invoice.
The Invoice Write Off screen opens, with the Matter field referencing the applicable matter. - From the Change Date drop-down, select the date.
- In the Change Explanation field, enter the description you want to display on the invoice.
- Take the appropriate action:
- Write-off full remaining balance
- Check the box beside Write-off full remaining balance.
- Click Save.
The Invoices screen updates the Invoice Balance field to 0.00 and Status field to Paid.
- Write-off full remaining balance
-
- Change
- In either the New or Change field for the applicable line items, enter your changes. For New, enter your updated total. For Change, enter the difference you want to apply as a negative amount.
The change column calculates and displays the line item adjustment amount and updates the invoice balance.
- In either the New or Change field for the applicable line items, enter your changes. For New, enter your updated total. For Change, enter the difference you want to apply as a negative amount.
- Change
-
-
- In the Notes field, you can enter internal notes that will display only on Change/Write-off reports.
- Click Save.
The Invoice screen updates the Invoice Balance field to the new total. - Double-click the invoice to generate it and view your changes.
-
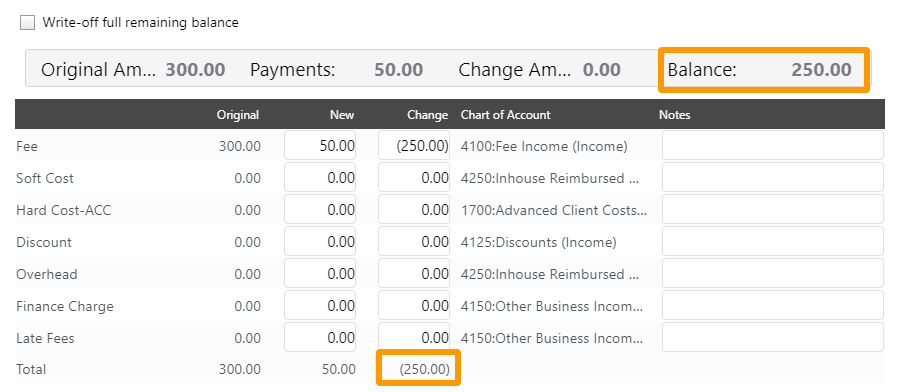
If payments were applied to the invoice, the Total Change must equal the invoice balance (in orange) for the write-off to be successful.
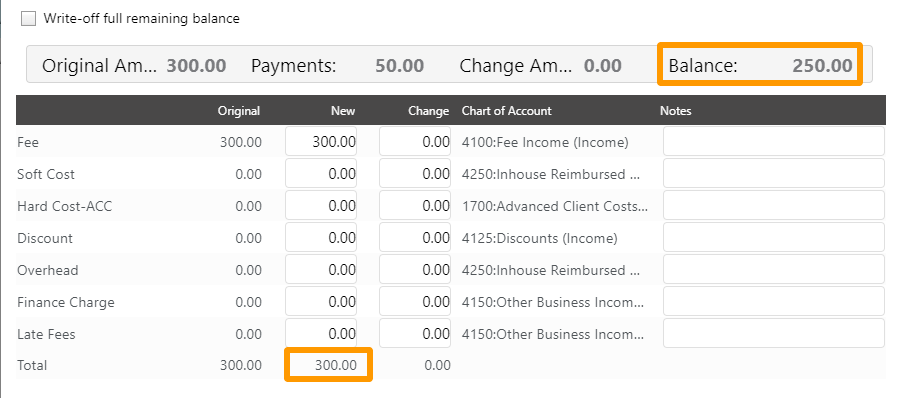
Example
Write-Off Invoice with Previous Payments (Before)
Before your adjustments, the write-off screen displays a Balance greater than the New column’s Total.
Write-Off Invoice with Previous Payments (After)
After adjustments, the write-off screen displays a Balance equal to the Change column’s Total, permitting a successful write-off.
Screen vs Invoice Comparison
The change explanation field description and line item change on the Invoice Write Off screen.
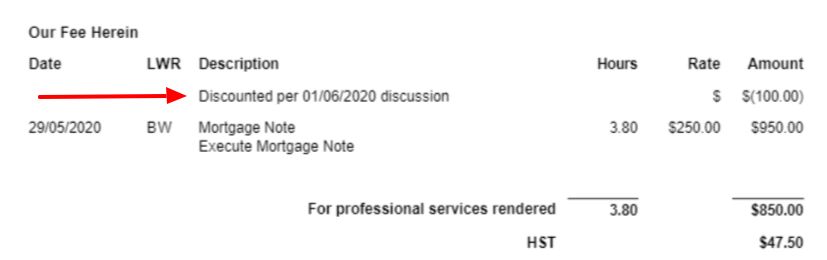
The change explanation field description and line item change on the invoice.
Change/Write-off Reporting
The Invoice Change/Write-offs – Journal includes records of all Change/Write-Off activity.
The Change/Write-Off function also impacts these reports:
- Invoice Journal
- General Ledger Report
- All financial and tax reports (Accrual Accounting)
Frequently Asked Questions (FAQ)
How can I edit previous Change/Write-off actions?
- Single-click the invoice to highlight it.
- From the toolbar, click Action > Change/Write-Off.
The Invoice Write Off screen opens in view mode. - Click the invoice to highlight it.
- From the toolbar, click Edit.
The Invoice Write Off screen opens in edit mode.
Who can change or write-off an invoice?
Users with permissions to edit invoices can change or write-off an invoice.
How can I see the original invoice without the changes?
- Single-click the invoice to highlight it.
- From the toolbar, click Print > Print Invoice (Multiple).
- Click Advanced Settings to expand the selection.
- Click to un-check the box beside Include effect of Write-off amount (if any).
- Click Print.
The PDF file generated does not reflect the write-off amount.
How can I apply payment to a previously waived invoice?
- Either generate a new invoice or locate the previous invoice.
- Make a change/write-off to the new invoice or edit your changes to the previous one.
- Apply the trust, operating, credit card, check, or cash payment, as applicable.