A timekeeper is the person who is assigned to a particular time or expense entry. When adding a User, the system will also add this individual as a timekeeper.
Edit a Timekeeper
You can access the Edit User – Timekeeper window from Setup or Account:
From Setup
- From the left navigation panel, click Setup.
- From the Setup left navigation, click Timekeeper.
- From the toolbar atop the Timekeeper screen, click Edit.
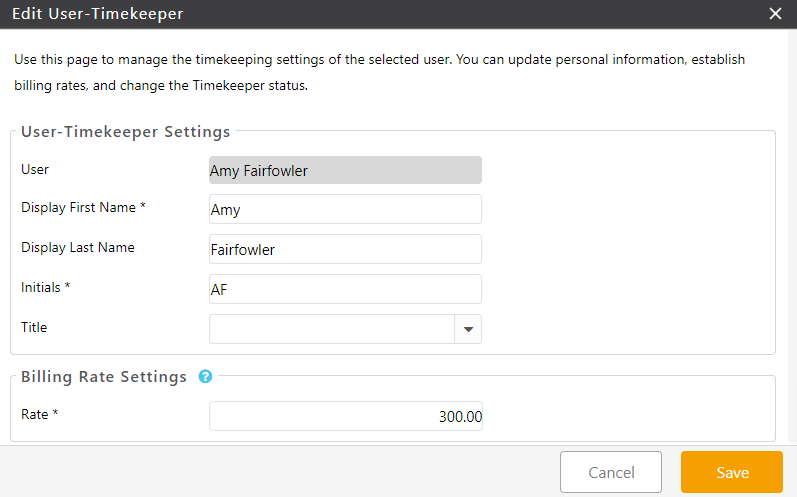
- On the Edit Timekeeper screen, from the Title field’s drop-down, click the timekeeper’s title. You can customize the Title drop-down list.
- Under the Billing Rate Settings section’s Rate field, you can edit the timekeeper’s default rate.
- If you set up class-based reporting, click the appropriate class.
- Under the Advanced Settings section’s Rate Settings tab, enter the timekeeper’s rates.
- In the lower right corner, click Save.
From Account
- From the left navigation panel, click Account.
- From the tabs atop the Account screen, click User.
- Either double-click a user or single-click and from the toolbar, click Edit.
- On the Edit User window, click the yellow View User icon beside Default Rate to open Edit User – Timekeeper window.
- On the Edit Timekeeper screen, from the Title field’s drop-down, click the timekeeper’s title. You can customize the Title drop-down list.
- Under the Billing Rate Settings section’s Rate field, you can edit the timekeeper’s default rate.
- If you set up class-based reporting, click the appropriate class.
- Under the Advanced Settings section’s Rate Settings tab, enter the timekeeper’s rates.
- In the lower right corner, click Save.
Add Descriptions to Rate Levels
You can customize your rate level descriptions. Users view the rate level descriptions when they create a matter or add a timecard.
To customize your rate level descriptions:
- From the left navigation panel, click Setup.
- From the Setup left navigation, click List Items.
- From the tabs atop the List Items screen, click Rate Level.
- On the Rate Level screen, single-click the level you want to change.
- From the toolbar, click Edit.
- On the Edit Rate Level screen, in the Description field, enter your preferred description, such as Attorney Fee, Court Fee, or Friends & Family.
- Click Save.
The system saves the rate level description. The description displays when you setup your rate within the timekeeper or select the rate level when you add or edit a matter.
Set a Default Timekeeper
To set a default timekeeper for your account:
- From the left navigation panel, click Setup.
- Atop the Setup left navigation, click Firm Settings.
- From the tabs atop the Firm Settings screen, click Firm Preferences.
- On the Firm Preferences screen, from the Default Timekeeper field’s drop-down, click the timekeeper you want to set as your firm’s default.
- In the upper right corner, click Save.
The Default Settings message box reads: Update Successful. - Click OK.
Deactivate a Timekeeper
To deactivate a timekeeper:
- From the left navigation panel, click Setup.
- From the Setup left navigation, click Timekeeper.
- From the toolbar atop the Timekeeper screen, click Edit.
- On the Edit Timekeeper screen, beneath the Advanced Settings section, uncheck the Active checkbox.
- Click Save.
The system moves the timekeeper to the Timekeeper tab’s inactive list.
Reactivate a Timekeeper
To reactivate a timekeeper:
- From the left navigation panel, click Setup.
- From the Setup left navigation, click Timekeeper.
- From the toolbar atop the Timekeeper screen, click Edit.
- On the Edit Timekeeper screen, beneath the Advanced Settings section, check the Active checkbox.
- Click Save.
The system moves the timekeeper to the Timekeeper tab’s active list.