
What is CosmoLexPay?
CosmoLexPay is our built-in payment processing service that allows you to:
- Receive an online credit card or eCheck invoice payment through an emailed link or our client portal.
- Request an online credit card or eCheck trust payment via an emailed link.
- Process credit card or eCheck trust deposits or invoice payments in-office or over the phone.
- Access your CosmoLexPay portal directly from the CosmoLex application.
- Pass on credit card processing fees to clients by opting for surcharging.
- Embed a payment link in your website.
As CosmoLex includes integrated accounting functionality, payments you receive through CosmoLexPay will simultaneously update your invoice, balances, and accounting records.
Visit cosmolexpay.com to learn more.
Information Needed to Enroll
Firms enrolling with CosmoLexPay can receive conditional approval, permitting them to accept credit card payments in as soon as one business day. Additional documentation will then be needed for full approval.
To streamline your application process, view our CosmoLexPay Onboarding Checklist which lists what information will be needed.
We also suggest taking a look at our surcharging feature beforehand, as you will be required to opt-in or opt-out at the start of the application process.
Starting Enrollment
- To begin your enrollment for CosmoLexPay, go to Setup > Apps.
- Click the toggle beneath the CosmoLexPay app tile. It will turn to ON.
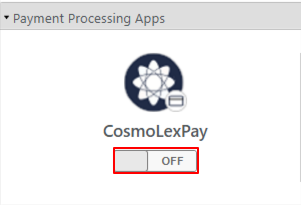
Integration Information
You will be prompted with the Integration Information screen. After reading the information, click Continue.
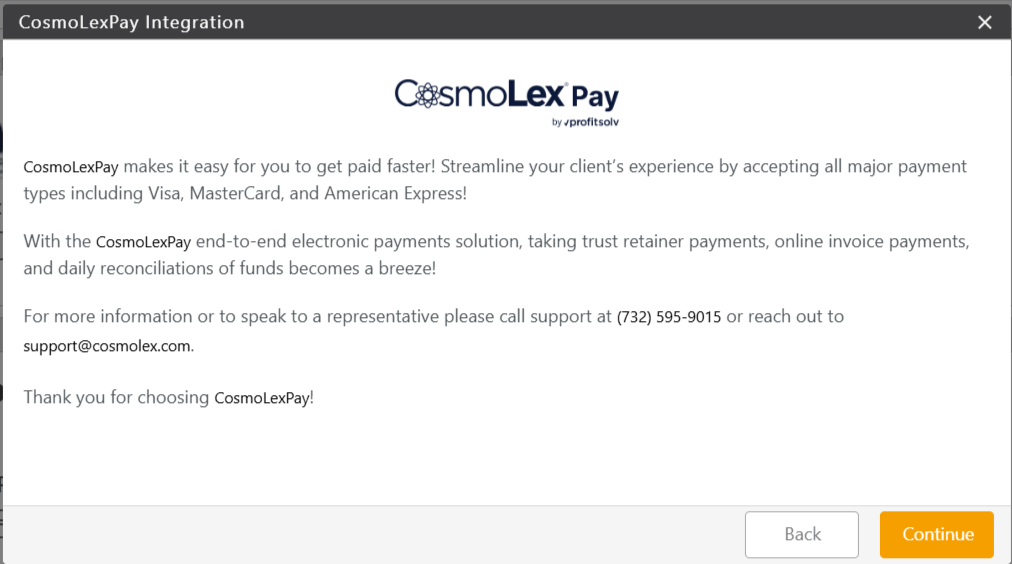
Completing Your Application
To complete the application process, complete the fields on the Business Details, Public Details, Ownership & Management, and Bank Accounts pages.
Business Details Page
On the Business Details page, fill in details related to your business.
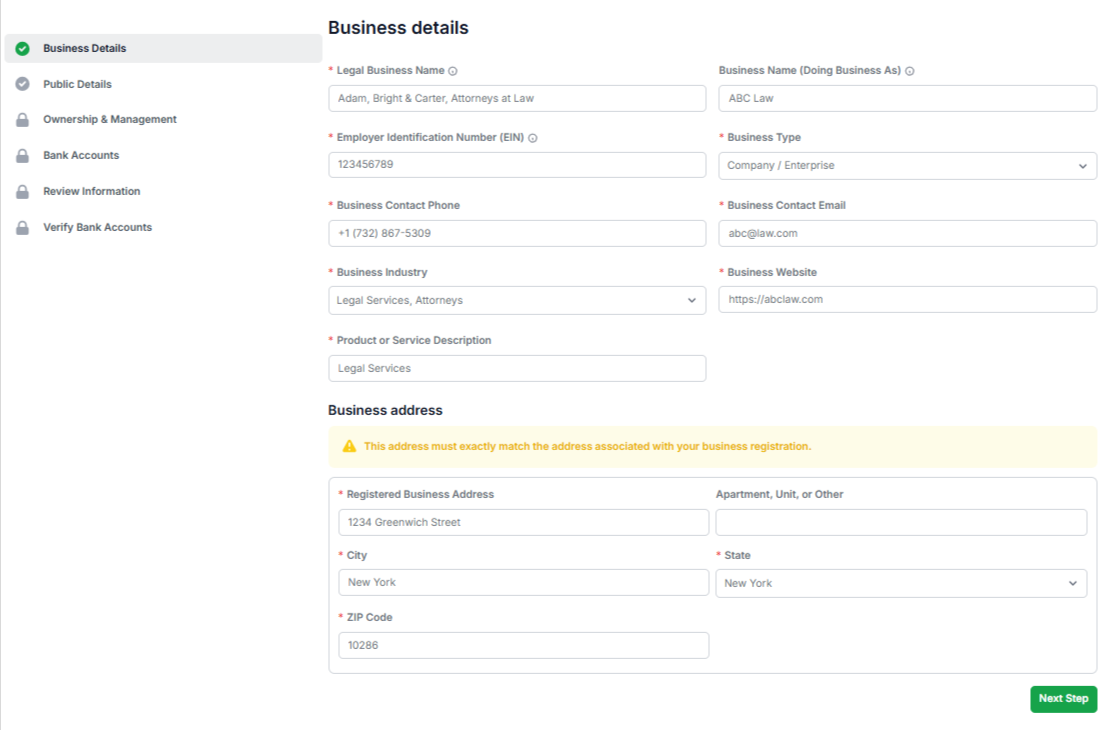
Business Details Page Fields
| Legal Business Name | Enter the registered name of your business as it appears on your tax returns. |
| Business Name (Doing Business As) | If your Legal Business Name is the same as your Doing Business As name enter the same name here, or enter the Doing Business As name registered with the state. |
| Employer Identification Number (EIN) | Enter your 9-digit IRS federal tax ID number in XX-XXXXXXX format for businesses, tax-exempt organizations and other entities. |
| Business Type | From the drop-down, choose between Company/Enterprise, Government, Individual or Sole Proprietor, and Nonprofit. |
| Business Contact Phone | Enter the Phone number which you would like to register in the portal. |
| Business Contact Email | Enter the official email id of your business. |
| Business Industry | From the drop-down, choose the business industry. |
| Business Website | If your firm has a website, enter the URL. This is a mandatory field. |
| Product or Service Description | Enter a description of the kind of business your firm does. |
| Registered Business Address | Enter the business address of your law firm. |
| City | Enter the name of your city. |
| State | From the drop-down, select your state. |
| ZIP Code | Enter the five digit numeric code for your registered business address. |
All fields marked with an asterisk (*) are required fields.
- Once you have filled all the required fields, click the green Next Step button.
- On the Public Details page, fill in your firm’s details.
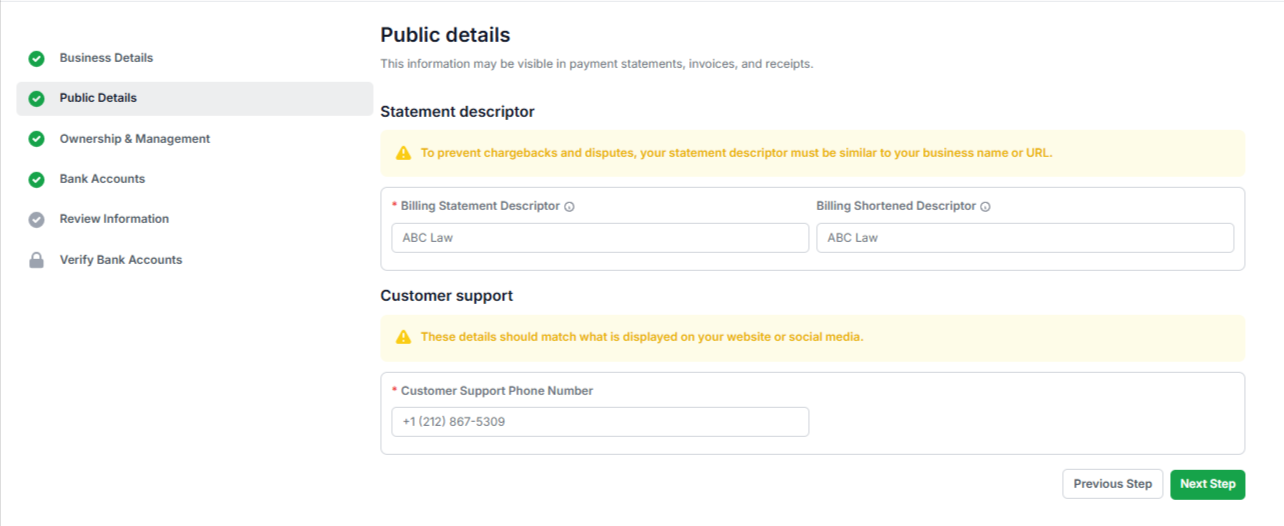
Public Details Page Fields
Billing Statement Descriptor This appears on your customers’ bank or credit card statements. Must be 5-22 characters. Billing Shortened Descriptor A shorter version of your billing descriptor. Used when space on a customer’s statement is limited. Must be 2-10 characters. Customer Support Phone Number This number should match the number displayed on your website or social media. - Once you have filled all the required fields, click the green Next Step button.
- On the Ownership & Management page, fill in the business owner’s details.
This information is required to ensure accuracy and protect your firm against fraud.
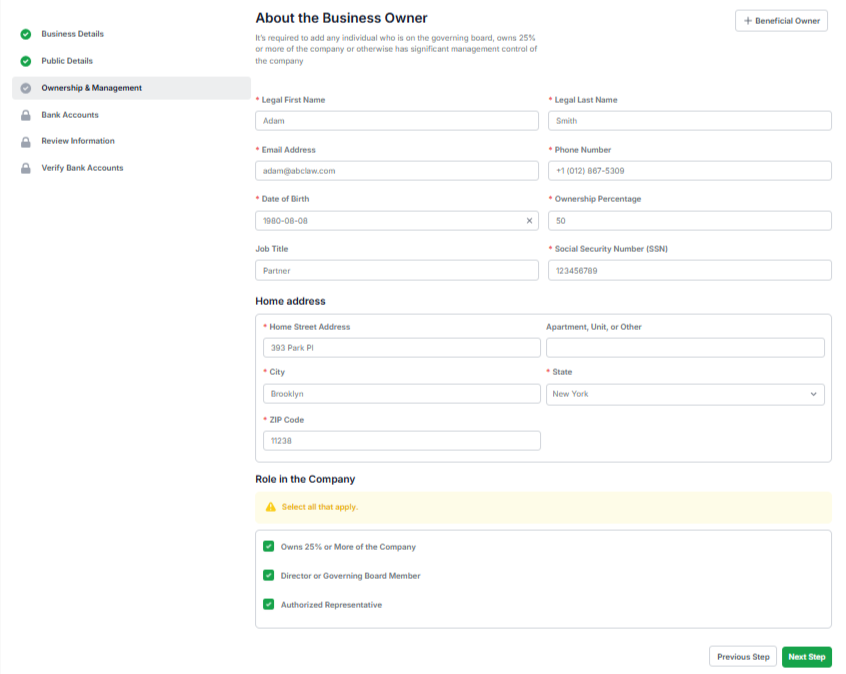
Ownership & Management Page Fields
Note: It’s required to add any individual who is on the governing board, owns 25% or more of the company or otherwise has significant management control of the company.
Legal First Name, Legal Last Name Enter your first and last name as it appears on your tax returns. Email Address Enter the email address of the business owner. Phone Number Enter the phone number of the owner. Date of Birth This should match your tax returns. Ownership Percentage If your firm is a partnership, mention your ownership percentage. Social Insurance Number (SIN) Enter your 9 digit Social Insurance Number. Please take the time to verify that you have entered the correct number. Home Address Enter the street address of your home. City Enter the name of your city. State From the drop-down, select your state. Postal Code Enter your five digit numeric area code Role in the Company Select all that apply: Note: If you do not check any one box, the system will prompt you to assign the role to an owner. You can use the Add Another Owner button to add more than one owner. - Once you have filled all the required fields, click the green Next Step button.
- On the Bank Account Details page, fill in your linked bank account details.
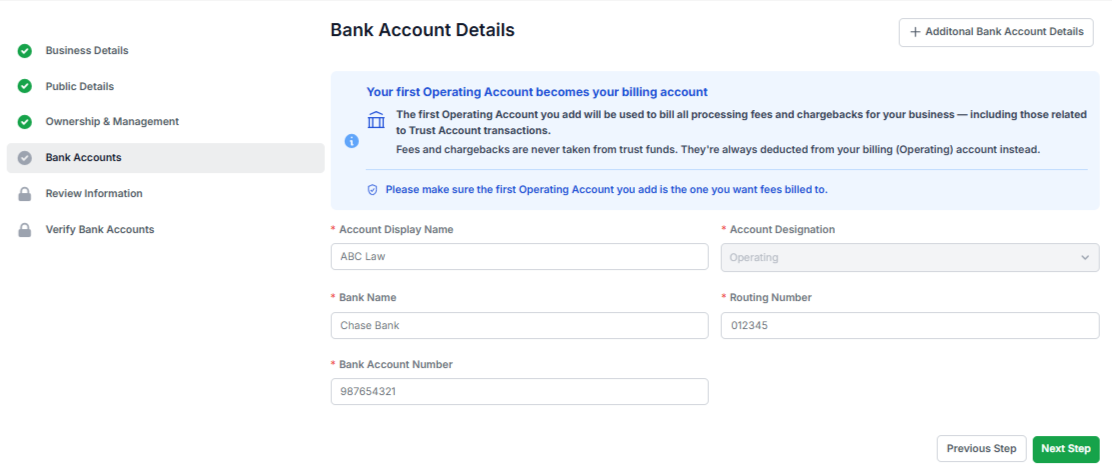
Entering your Deposit Details will let CosmoLexPay know where to deposit your transactions. Even if you choose to deposit ALL transactions into a trust account, processing fees will only be debited from an operating account. Having as many deposit accounts as you need allows you to correctly separate deposits and avoid co-mingling funds.
Add Bank Account FieldsAccount Display Name Enter the name you use for this account. Account Designation This will default to Operating. Click the Additional Bank Account Details button in the top right to add another bank account. Here you can choose to add a Trust bank or another Operating bank. Bank Name Enter the name of your Bank. Routing Number Enter the 9-digit routing number which can be found on the bottom of your personal cheques. Please take the time to verify that you have entered the correct number. Bank Account Number Enter the Bank Account Number.
- Once you have filled all the required fields, click the green Next Step button.
- On the Review Information page, take time to review carefully the details you entered. If you wish to make changes, click on the Edit button beside the page name.
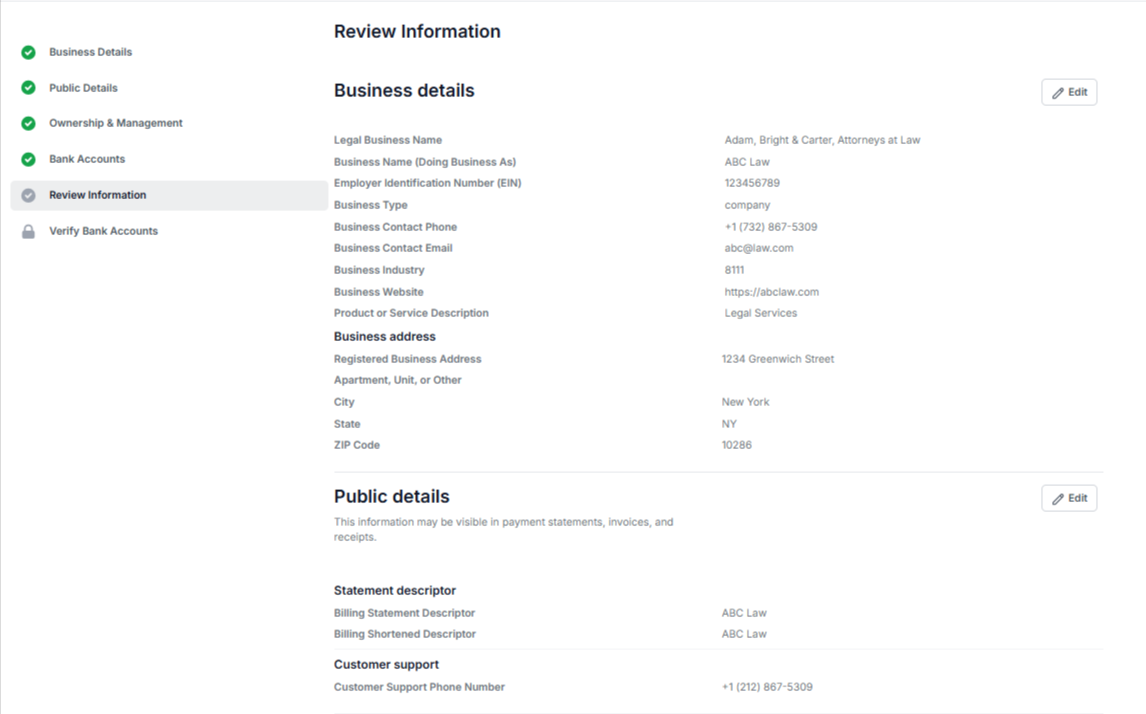
- Once you have reviewed the page, click the green Continue button.
- Review you payment processing rates. Read the Terms and Conditions listed below, you can choose to Download/Print the terms and conditions.
- If you agree to to the T&C, click Agree and Continue.
- On the Verify Your Bank Accounts page, the bank accounts listed must be verified to confirm that the bank account information is valid, this may take 3-5 minutes. Click Start Verification.
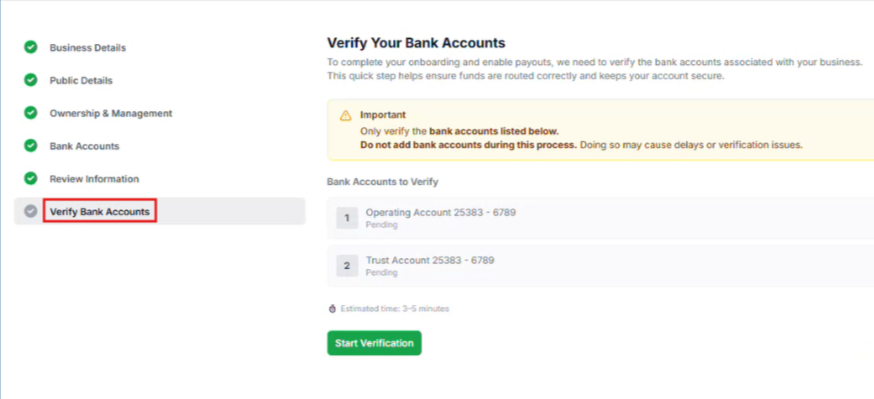
- You will be directed to complete the Multi-Factor Authorization that your bank requires and some additional details to confirm the particulars you entered earlier.
- Once complete, click Continue. Once you’ve verified your Operating account, follow the same steps to verify your Trust account.
- Click Agree and Submit.
- You will get a success message that the enrollment has been submitted and will be redirected to in 3 seconds. If you wish, you can click the Go Back to button below.
Application Approval
When you go back to CosmoLexPay, you can check the status of your application under Account > Account Management > CosmoLexPay.
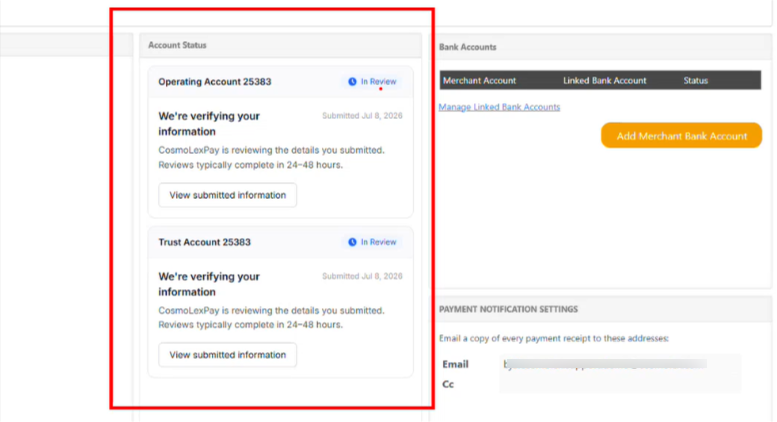
View the CosmoLexPay Dashboard
The CosmoLexPay dashboard will show the firm administrator any activity on the CosmoLexPay account.
To view the CosmoLexPay dashboard:
- From the bottom of the left navigation panel, click Account.
- From the Account left navigation, click CosmoLexPay.
The CosmoLexPay dashboard will display sections with information on
- Transactions (includes links to CosmoLexPay Portal, View Payment, and Reports)
- Account Status
- Bank Accounts – This is where you will link your merchant account to CosmoLex bank accounts

Associate Your Bank Accounts
Once conditionally approved, to start accepting electronic payments in CosmoLex, you will need to associate your newly created merchant accounts, with bank accounts listed in CosmoLex.
- On the CosmoLexPay dashboard screen, go to the Bank Accounts section to the right, click on Link Bank Accounts.
- The Link Bank Accounts screen opens displaying the following:
Type: The account type designated when setting up your merchant accounts (Operating or Trust)
Merchant Account: The operating and/or trust accounts that were provided in your submitted application.
Bank Account: This dropdown includes the bank accounts already in CosmoLex. Choose the CosmoLex bank account that you wish to link to this CosmoLexPay merchant account.
If you would like to add bank accounts to this list or edit their names, exit this screen and complete that information under Accounting > Banks before proceeding.
Default Operating Merchant Account: Click on the radio button if you would like to receive online invoice payments in the selected account.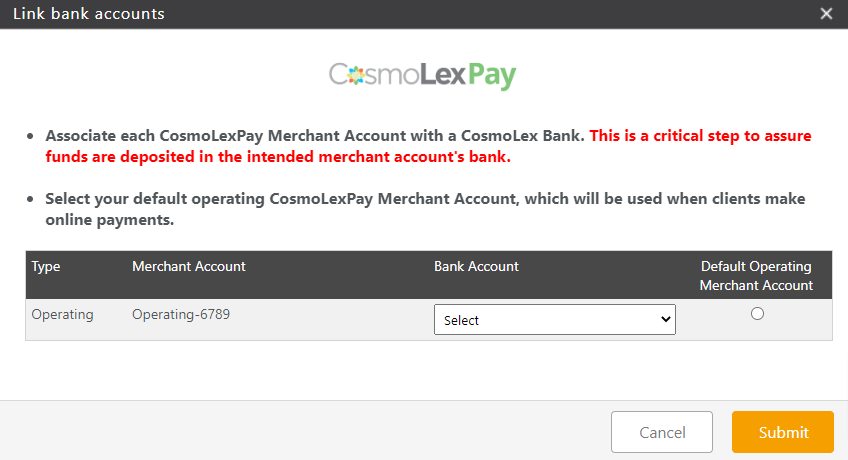
- Click Submit.
The message asks you to confirm, Selected bank account will be used for CosmoLexPay transactions in CosmoLex. Would you like to continue? - Click Yes.
The message reads, Your CosmoLex Banks were associated successfully. - Click OK.
You are now ready to receive deposits through CosmoLexPay!