CosmoLex supports the industry-standard eBilling formats known as LEDES 1998B, LEDES 2000, LEDES 2.0, and Litigation Advisor and the international eBilling format, LEDES 98BI. If your firm requires another format, please contact our support department.
Once you enable eBilling in a matter, eBilling codes will become available when entering time or expense cards. Normally, standard UTBMS codes are used for this purpose, but your clients might specify different codes to use. You can view and customize the provided UTBMS codes under Setup > List Items.
With eBilling, each fee transaction has a task code and an activity code. Each expense transaction has an expense code.
Step 1: Enable at the Firm Level
We recommend a well-trained person at your firm perform the eBilling setup. We also recommend sending a sample eBill to your clients for review.
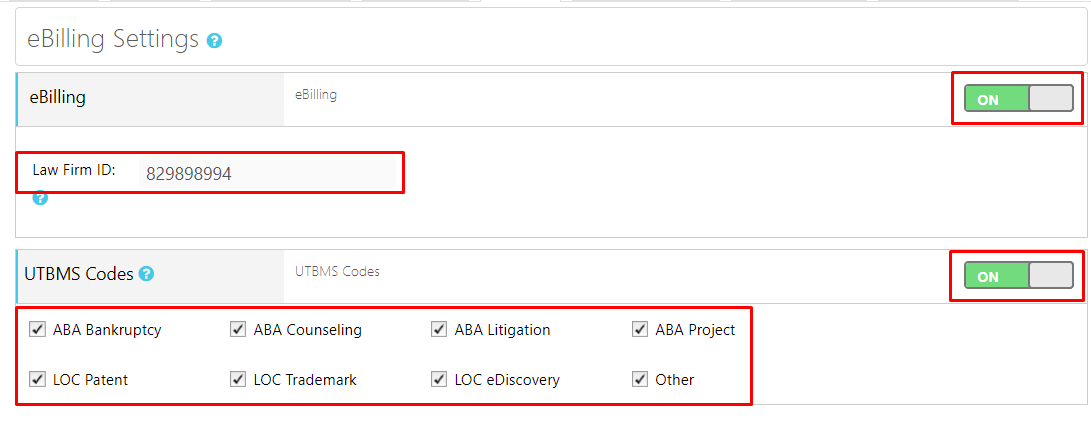
To enable eBilling in the LEDES format:
- From the left navigation panel, click Setup.
- Atop the Setup left navigation, click Firm Settings.
- From the tabs atop the Firm Settings screen, click eBilling.
- To the far right of the eBilling field, click the Off switch.
The switches for eBilling and UTBMS Codes turn green and switch On. - In the Law Firm ID field, enter your firm’s ID. Most commonly, this is the law firm’s tax identification number (TIN).
- In the UTBMS Codes section, check the boxes that pertain to your practice.
Step 2: Complete Timekeeper Fields
To enable eBilling at the Timekeeper level:
- From the left navigation panel, click Setup.
- From the Setup left navigation, click Timekeeper.
- On the Timekeeper screen, double-click a Timekeeper’s name, or single click it, then from the toolbar click Edit.
- On the Edit Timekeeper screen, click Advanced Settings.
- From the tabs atop the section, click eBilling.
- In the ID field, enter the timekeeper’s ID. This unique identifier is a required field that determines the Timekeeper for whose time the client is billed. The ID can be an employee ID #, initials, social security number, or a unique identifier of your choosing.
- From the Classification drop-down, click the closest match for the Timekeeper you are editing.
- Click Save.
- Repeat steps 3-6 for each Timekeeper.
Step 3: Complete Client Fields
To enable eBilling for a client contact:
- From the left navigation panel, click Contact.
- From the Contact left navigation, click Client.
- On the Client screen, double-click the client who needs eBilling, or single-click, then from the toolbar, click Edit.
- On the Edit Client screen, in the Client Identification Number field, enter the Client ID.
- Click Save.
The Client Contact updates.
Step 4: Enable at the Matter Level
For New Matter
To enable eBilling for a new matter:
- Follow the steps to Add a Matter.
- Make sure that the Matter File # field contains an entry. The Matter File # is an alphanumeric figure your firm assigns which must be specified for each matter to enable eBilling. You can enter the number manually, or enable automated file numbering.
- Once you have completed all the required fields, check the box beside Enable eBilling.
- Click Save. You will be redirected to the eBilling screen in the Matter’s Settings area.
For Existing Matter
- From the left navigation panel, click Matters.
- On the Matters screen, single-click the matter to highlight it, then in the toolbar, click Edit.
- From the bottom of the Edit Matter left navigation, click Settings.
- From the tabs atop the Settings section, click Matter Info.
- On the Matter Info screen, confirm the Matter File # field contains an entry.
The Matter File # is an alphanumeric figure your firm assigns which must be specified for each matter to enable eBilling. You can enter the number manually, or enable automated file numbering. - Click Save.
- From the tabs atop the Setting section, click eBilling.
- Check the box to Enable eBilling.
eBilling Screen Fields
- Check the box to Enable UTBMS Codes.
If you enable eBilling, you should also enable UTBMS Codes unless you are using client provided codes. However, you can enable UTBMS codes without enabling eBilling. - Check the box to Restrict Task Codes, if needed.
If the matter’s client only allows restricted codes, set those restrictions here. This will ensure that only the appropriate codes are available when entering Time/Expense cards for this matter. - Choose your eBilling format.
- Complete the remaining fields below.
Then click Save. An eBilling symbol displays to the left of the matter’s row.
| LEDES 1998B | LEDES 98BI | Litigation Advisor |
|
|
|
| LEDES 2000 | LEDES 2.0 |
|
|