Hard cost expenses refer to out of pocket transactions and their subsequent reimbursement. In CosmoLex, you can assign multiple matters and firm expenses in a single transaction.
These expenses include items such as:
- Filing fees
- Postage
- Expert witness fees
- Court costs
Tracking these reimbursable costs separately provides your firm with accurate revenue accounting to offset your Profit and Loss expenses.
Watch a Video
Add a Hard Cost
You can add a hard cost from:
- Shortcut Key (Press H)
- Global Add Shortcut
- Matters Landing Page
- Matters Details
- Activities
- Bank Transaction
- Accounts Payable
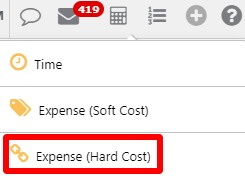
Global Add Shortcut
- From the top right side of the screen, click the Global Add Shortcut (plus sign).
- From the drop-down that displays, click Expense (Hard Cost).
The Expense – Hard Cost screen opens.
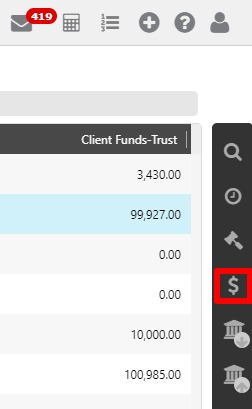
Matters Landing Page
- From the left navigation panel, click Matters.
- From the Matters screen right navigation, click the dollar sign.
The Expense – Hard Cost screen opens.
Matters Details
- From the left navigation panel, click Matters.
- In the Matters screen, double-click the matter, or single-click the matter to highlight it, then in the toolbar atop the screen, click Details.
- From Matters Details left navigation, click Billing.
- From the tabs atop the Billing screen, click Time/Expense.
- From the toolbar atop the Time/Expense screen, click Add Expense > Hard Cost.
The Expense – Hard Cost screen opens.
Activities
- From the left navigation panel, click Activities.
- Atop the Activities gray left navigation, click Time/Expense.
- From the toolbar atop the Time/Expense screen, click Add Expense > Hard Cost.
The Expense – Hard Cost screen opens.
From Bank Transaction
You can post a transaction to your operating account, then link it to a matter to retroactively create a hard cost expense.
The result is the same, the location of entry depends on your firm’s workflow.
If your bookkeeper manages hard costs and prefers to work in the Accounting section, they can enter transactions through the operating/general account and assign them to their respective matters. Adding hard cost expenses this way can be advantageous if your firm incurs a cost, then later decides it must be posted to a specific matter.
To add a hard cost from a bank account:
- Create a withdrawal transaction in your operating bank.
- When completing the transaction, check the Post as matter expense box.
From Accounts Payable
If this is an anticipated cost, you can create an Accounts Payable (AP) bill and post it to the matter for payment at a later date.
Hard Cost Fields
The Expense – Hard Cost screen is divided into two main sections: Transaction Section and Split Section
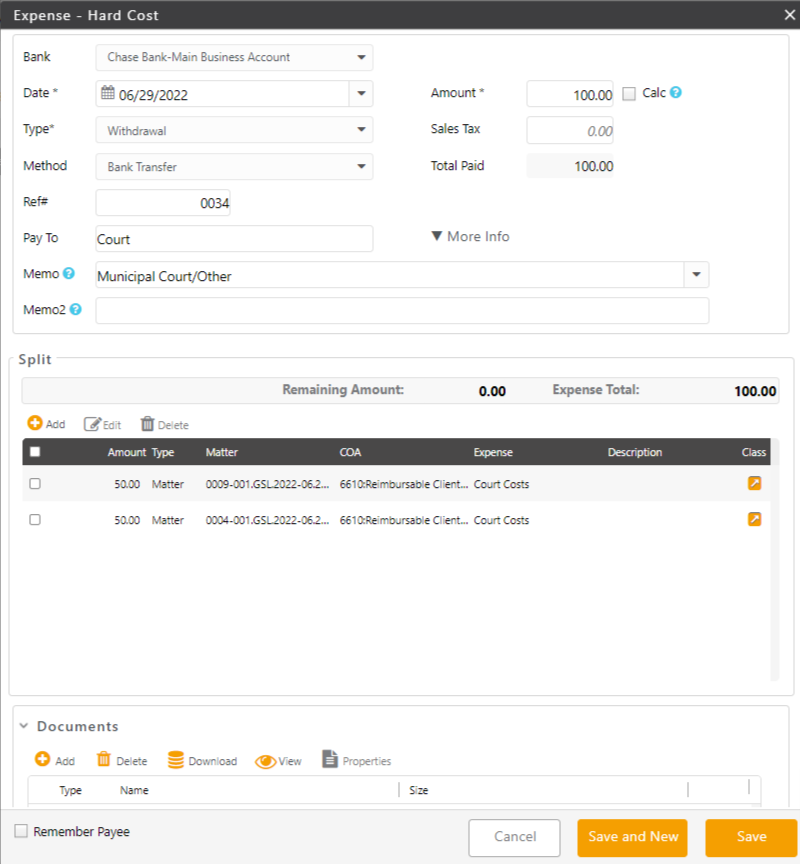
Transaction Section
|
Bank
|
|
|
Date |
|
| Amount |
|
| Calc box* |
(*Only for states/provinces where tax is to be calculated.)
|
| Type |
|
| Method |
|
| Check#* |
(*Will only display if you select Check as the payment method)
|
| Pay To |
|
| Address |
|
|
Memo |
|
|
Memo2 |
|
Split Section
In this section you can add the details of this hard cost as well as have the option to split this cost. For example, you could be paying a vendor for an amount that includes expenses across matters and/or the firm.
To add an item:
- From the tabs atop the split section, select Add.
- From the drop-down, take the appropriate action:
-
- Select New Matter Expense if you want to create new expense in a matter.
- Select Existing Matter Expense if you want to link existing soft cost to the transaction.
- Select Firm Expense if the firm is covering a portion of this expense.

New Matter Expense
Selecting New Matter Expense will automatically open an Expense Card.
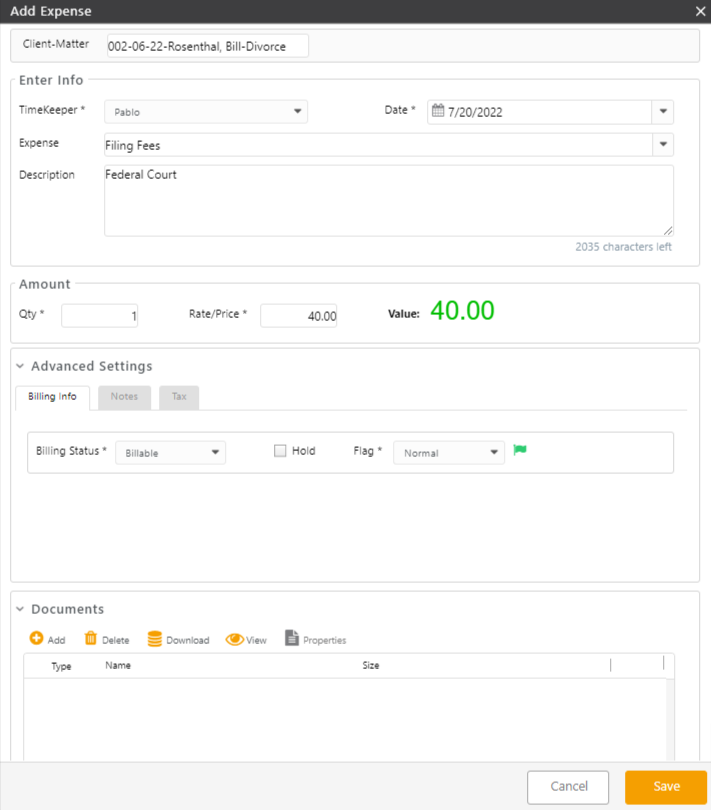
| Client – Matter |
|
||||||
| Disbursement Incurred as an Agent* |
|
||||||
| Timekeeper |
|
||||||
| Expense |
|
||||||
| Description |
|
||||||
| Amount |
|
||||||
| Advanced Settings Section | |||||||
| Billing Info Tab | |||||||
| Billing Status |
|
||||||
| Hold |
|
||||||
| Flag |
|
||||||
| Notes Tab |
|
Tax Tab
| Taxable | Unchecked |
|
|---|---|---|
| Checked |
|
Documents Section
Add and manage documents associated with the expense.
| Documents | You can add, delete, download, and view documents or check document properties. |
Existing Matter Expense
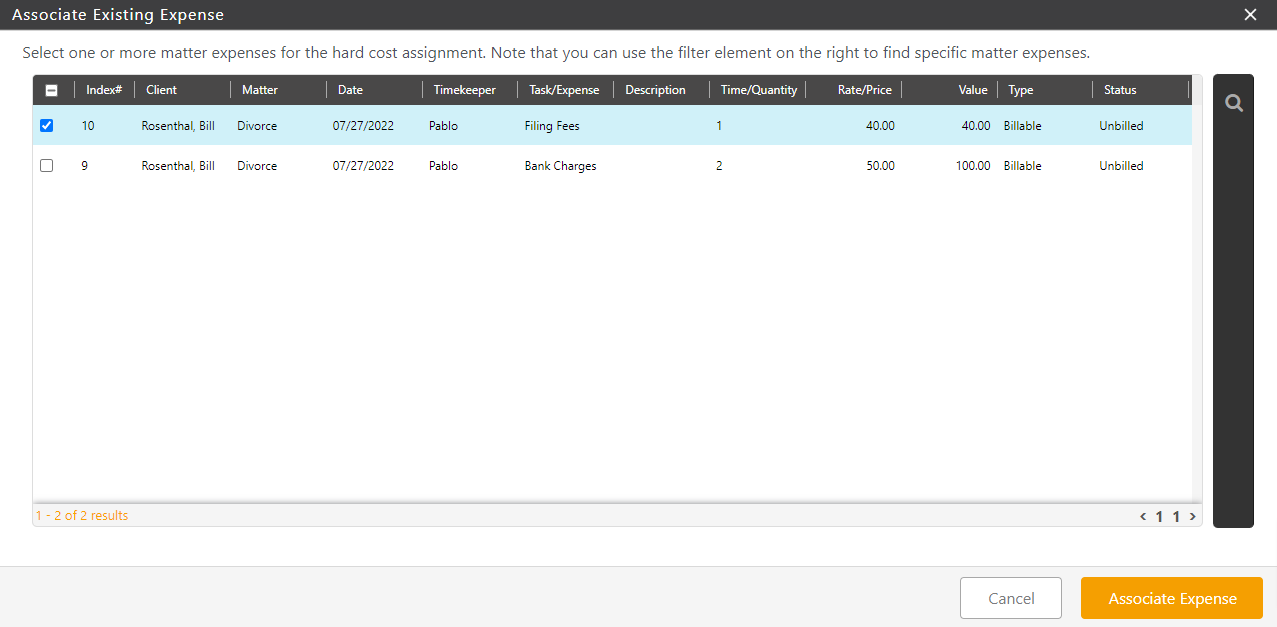
- Clicking on Existing Matter Expense will take you to the Associate Existing Expense screen. The screen lists all your matter expenses.
- If you wish to find specific matter expenses, you can use the filter on the right.
- Check the box beside the matter expense(s) which you would like to associate with this transaction.
- Click Associate Expense in the lower right corner.
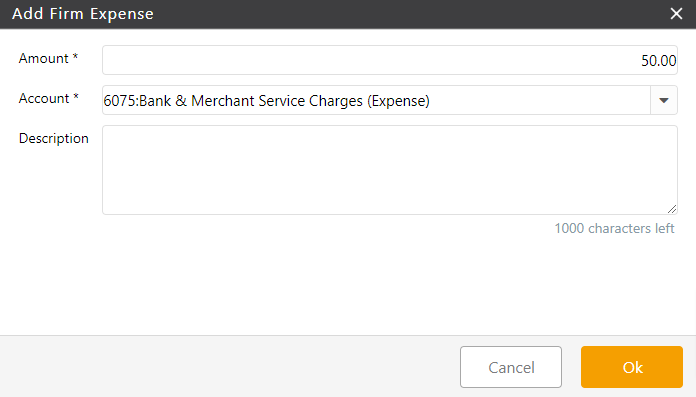
Firm Expense
You can choose to add this transaction to you firm’s expenses. Complete the fields on the Add Firm Expense screen.
| Amount |
|
| Account |
|
| Description |
|
Save Options
| Save and New |
|
|---|---|
| Save |
|
- In the lower left corner, check the Remember Payee box to add them to your Payees list, if desired.
