Once you have enabled a matter for split billing and configured it to split the bill with other matters, you can then begin to split bills between the main matter and secondary matters.
Learn how to set up split billing.
Watch a Webinar
Perform Split
You can perform a split from the main Matters page or for an individual matter from the matter’s billing section. To make search easier, you can filter matters (main and secondary) that are enabled for split billing.
Main Matters Page
To perform a split from the main Matters page:
- From the left navigation panel, click Matters.
- From the tabs atop the Matters screen, click Action.
- From the actions that display in the drop-down, click Perform Split.
- On the Perform Split page, today’s date will display by default, you can override the date by clicking on the arrow and choosing a different date from the calendar.
- From the list of matters that displays, select a matter and click Split.
Your split will be queued, you can add it to the Job List. System will split all the WIP (time entries, soft cost and hard cost expense) to the split matter(s) with the percentage configured.
Matter’s Billing Section
To perform a split from a matter’s billing section:
- From the left navigation panel, click Matters.
- From the list of matters that displays, either double click a matter or single click and from the toolbar, click Details.
- From the Matter’s left navigation, click Billing.
- From the tabs atop the Billing screen, click Time/Expense.
- From the tabs atop the Time/Expense screen, click Action.
- From the actions that display in the drop-down, click Perform Split.
On the Perform Split page, confirm that you want to perform the split by clicking Yes.
Your split will be queued, you can add it to the Job List. System will split all the WIP (time entries, soft cost and hard cost expense) to the split matter(s) with the percentage configured.
How Split Entries Display on the Invoice
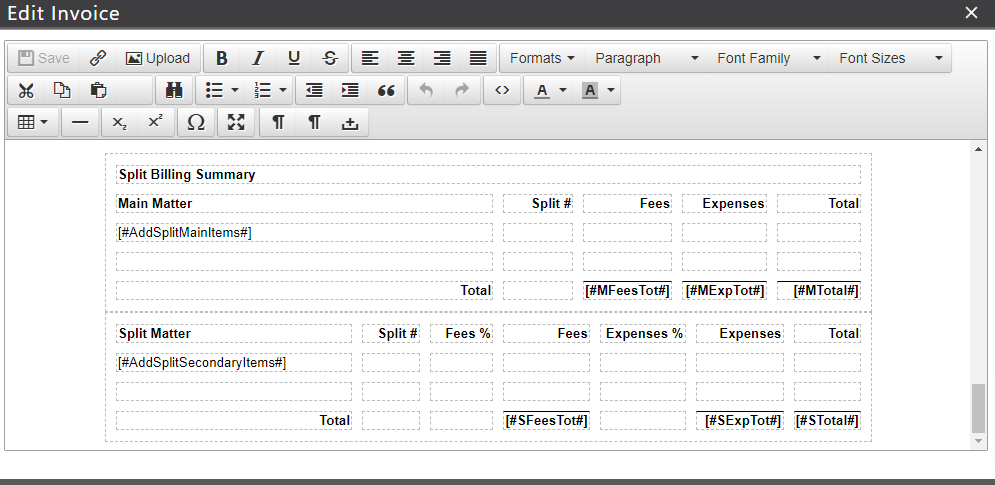
All the system defined invoice templates will include a split billing summary table which will display the main matter information and split information for selected matter. This table will only appear on the invoice if the matter is part of split billing. This table can be removed from the invoice template if you do not wish to display it in the invoice by navigating to Setup > Firm Settings > Invoice Settings > Edit Invoice.
Undo Split
You can undo a split from the main Matters page or for an individual matter from the matter’s billing section. Undo split can only be performed for the main matter.
Main Matters Page
To undo a split from the main Matters page:
- From the left navigation panel, click Matters.
- From the tabs atop the Matters screen, click Action.
- From the actions that display in the drop-down, click Undo Split.
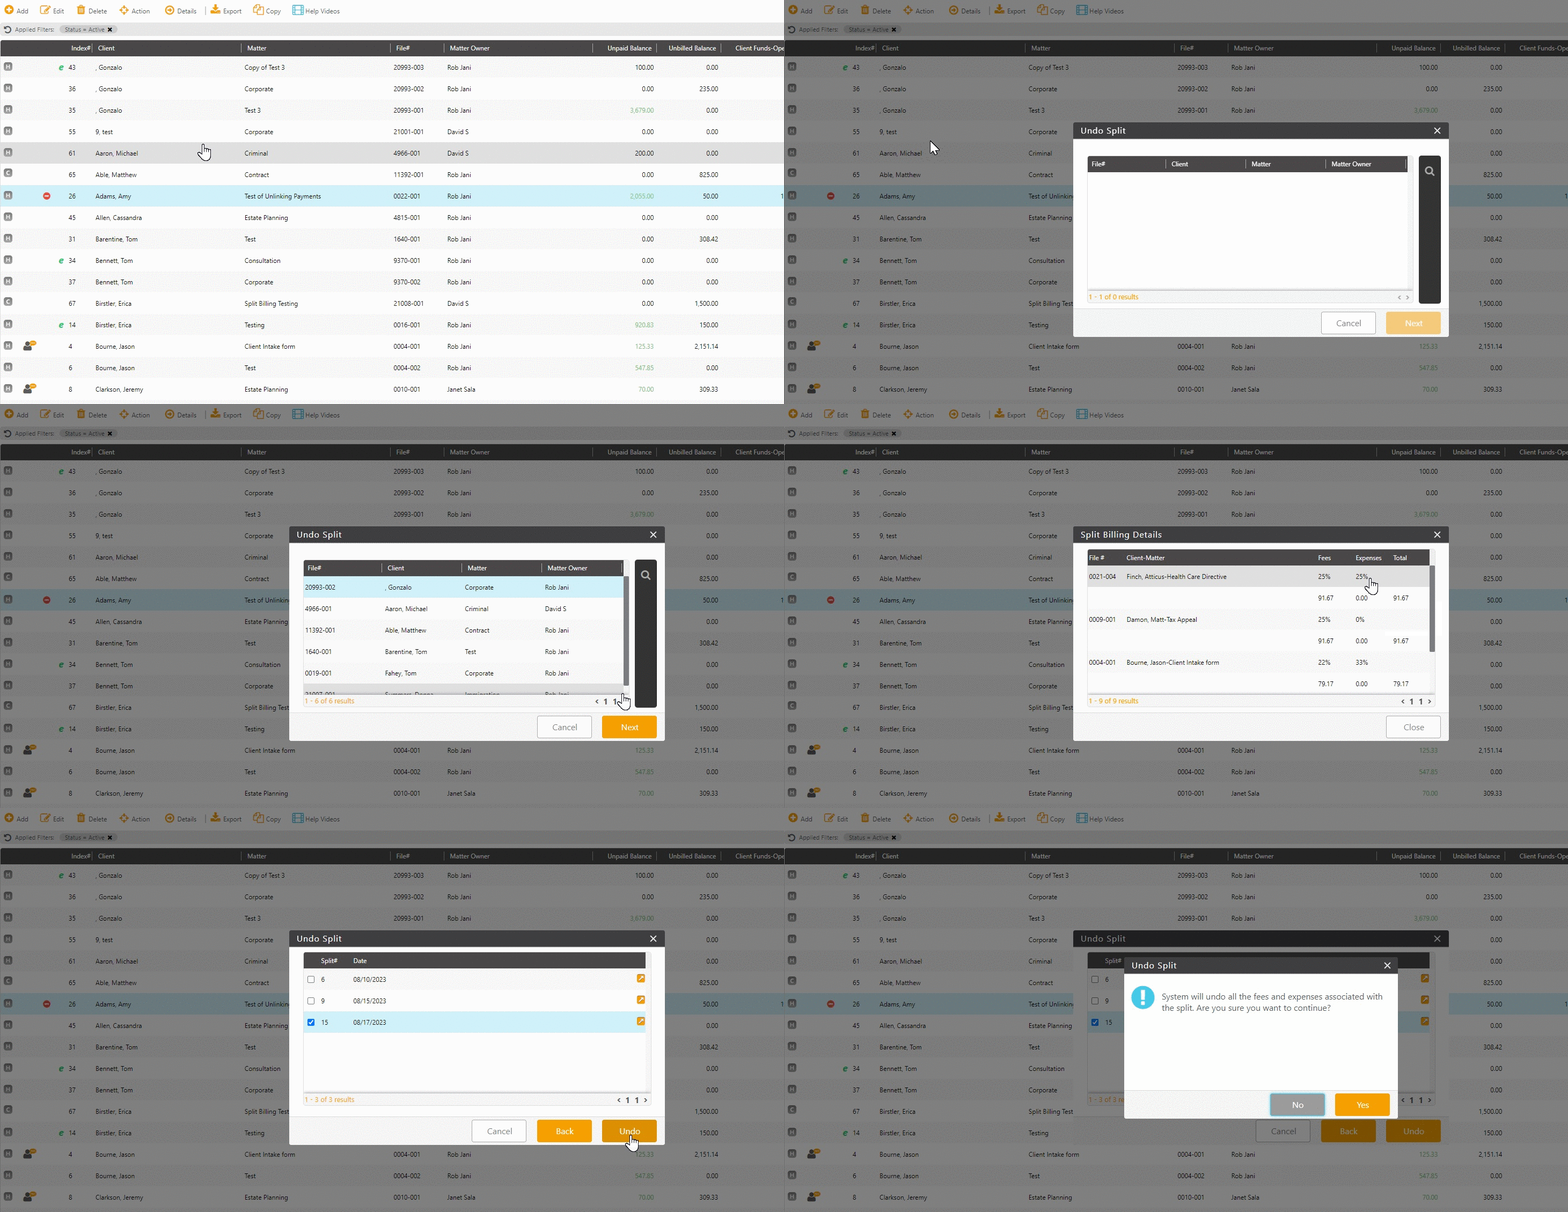
- On the Undo Split page, from the list of Matters that displays, select a matter and click Next.
- All the splits for that matter will be listed, with split# and date, check the box beside the split you want to undo.
- Once you have selected the split you wish to undo, click Undo. You can choose to go back or cancel.
- On the Undo Split screen, confirm the message prompt System will undo all the fees and expenses associated with the split. Are you sure you want to continue? by clicking Yes.
Your undo split will be queued, you can add it to the Job List.
Once Undo Split is completed all the entries will be restored to the main matter.
Matter’s Billing Section
To undo a split from a matter’s billing section:
- From the left navigation panel, click Matters.
- From the list of matters that display, either double click a matter or single click and from the toolbar, click Details.
- From the Matter’s left navigation, click Billing.
- From the tabs atop the Billing screen, click Time/Expense.
- From the tabs atop the Time/Expense screen, click Action.
- From the actions that display in the drop-down, click Undo Split.
- On the Undo Split page, all the splits for that matter will be listed, with split# and date, check the box beside the split you want to undo.
- Once you have selected the split you wish to undo, click Undo. You can choose to go back or cancel.
- On the Undo Split screen, confirm the message prompt System will undo all the fees and expenses associated with the split. Are you sure you want to continue? by clicking Yes.
Your undo split will be queued, you can add it to the Job List.

