You can manage your incoming text messages to better organize them within CosmoLex. If an inbound SMS is a match to a contact, the message will automatically be tagged to that contact. However, you will need to assign each message to a specific matter. You can use the Activities section to:
- Mark as read
- Mark as unread
- Tag messages
- Untag messages
- Associate Labels
- Flag messages
- Delete messages
- Restore deleted messages
- Bill for your time
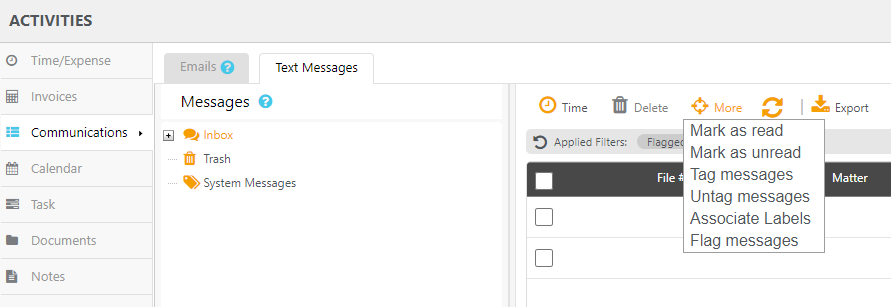
Access Text Messages from Activities
- From the left navigation panel, click Activities.
- From the Activities left navigation, click Communication.
- From the tabs atop the Communication screen, click Text Messages.
Mark as Read/Unread
To mark messages as read/unread:
- On the Text Messages screen, check the boxes beside the messages you wish to mark as read/unread.
- From the toolbar atop the screen, click More.
- From the drop-down, select the appropriate option Mark as read/Mark as unread.
Tag Messages
To tag a message to a matter:
- On the Text Message screen, check the boxes beside the messages you want to tag.
- From the toolbar, click More > Tag messages.

- On the Tag Messages screen, either:
- Enter the first few letters of the Matter. From the possible matches that display in the drop-down, select the Matter. OR
- From the list of possible matches, check the box beside the phone number you wish to match with the message.
- Once you have made your choice, click Save. After you have assigned a matter and/or contact, the message or entire conversation will be available in the Matter Text Messages area.
Untag Messages
If you tag a message to the wrong matter, you can untag it and then tag it to the correct matter.
To untag an SMS:
- On the Text Message screen, check the boxes beside the messages you want to untag.
- From the toolbar, click More > Untag messages.
The system untags the message.
Associate Labels
To associate labels to the text message:
- On the Text Message screen, check the box beside the message(s) to which you want to associate labels.
- From the toolbar, click More > Associate Labels.
- On the Associate Labels pop-up, click on + Add New Label. You can choose ‘Create New Label’ option to create a new label or select an existing label from the list. This list is managed under Setup > List Items
- Click Save.
The system updates the message label.
Flag Messages
Flagged Messages will have a red flag icon displayed and moved to a separate list, filtered out of your normal view. This will not block the sender from sending future messages. However, maintaining these messages can help with future requests to block a sender.
- On the Text Message screen, check the boxes beside the messages you want to flag.
- From the toolbar, click More > Flag messages.
- On the Flagging Numbers pop-up, read the message and click Save.
To access a list of your flagged messages, use the grid filter and choose ‘Flagged Messages’ as True.
Delete Text Messages
There may be a message unrelated to a client and unnecessary to have in CosmoLex.
To delete an SMS:
- On the Text Message screen, check the boxes beside the message(s) you want to delete.
- From the toolbar, click Delete.
The system will move this message to the Trash folder under Activities > Communications > Text messages. The system automatically empties the trash folder every 30 days.
Restore a Deleted Message
If a message is still in the Trash folder, it can be restored.
To restore a deleted SMS:
- On the Text Messages screen, click on Trash.
- From the messages in the Trash folder, select the message you want to restore.
- From the tabs atop the list of messages, click More.
- From the options in the drop-down, click Move to Inbox.
Your message will be moved back to the inbox.
Billing for Your Time
To bill time for an SMS: 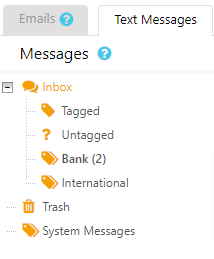
- On the Text Messages screen, click the + icon beside Inbox.
- Select from Tagged, Untagged, Bank, or International.
- From the list of messages that display to the right, check the box beside the message which you want to bill for.
- From the toolbar, click Time > Add Time Card.
The Add Timecard screen opens. - Complete the timecard. For additional information, see Timecard Field Descriptions.
- Click Save.