Using CosmoLex’s built-in Text Messaging (SMS) service provides you with an easily accessible way to reach your clients from within the CosmoLex application. By enabling this service, your firm will be able to:
- Engage in two-way text messaging with clients and keep those conversations linked to a specific matter.
- Send an embedded link to invoices, reminders, and low retainer requests to notify clients of payments due.
- Include an embedded payment link to take payments quickly and conveniently if your firm is using the CosmoLexPay or LawPay integration.
Starting Enrollment

To begin your enrollment for SMS:
- From the bottom of the navigation, click Account.
- From the Account left navigation, click SMS.
- On the SMS Messaging screen, click to start the enrollment process.
- This will take you to the CosmoLex SMS Integration information screen. After reading the information, click Continue.
Application Process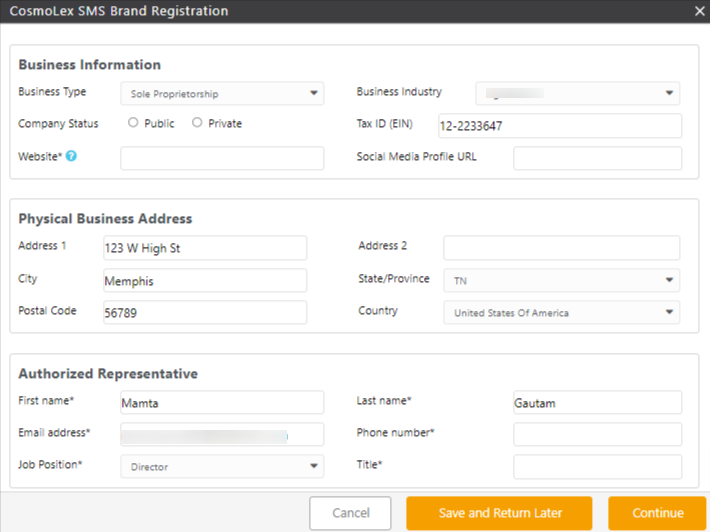
- To complete the application process, on the CosmoLex SMS Brand Registration screen, complete the fields in the Business Information, Physical Business Address, and Authorized Representative sections.
CosmoLex SMS Brand Registration Fields Description Legal Business Name - This defaults to the firm name that you entered under Settings > Firm Settings > Firm Information.
- Ensure that you enter the legally registered name of your firm that matches your Tax ID.
- Failure to do so will result in delays or rejection by regulatory authorities.
Business Information Business Type From the options in the drop-down, select your business type. Business Industry From the options in the drop-down, select your business industry. Company Status - Click the radio button to choose between Public or Private.
- If you select Public, enter the Stock Exchange and Ticker Symbol in the fields that display.
US – Tax ID (EIN)
Canada – Business Number (BN)
US users, enter your nine-digit Employer Identification Number.
Canada users, enter the first nine digits of your business number without any letters.
Website - Enter the URL for your firm’s website.
- If you do not have a website, you can enter the URL for your firm on a social media site.
Social Media Profile This is an optional field. Enter your Social Media URL, if desired. Physical Business Address Address 1 Enter your street address. Address 2 Enter any additional details of your address. City Enter the name of your city. State/Province From the drop-down, select the name of your State/Province. Postal Code Enter your postal code. Country Defaults to the country selected when registering for CosmoLex. Authorized Representative First Name Enter the first name of your authorized representative. Last Name Enter the last name of your authorized representative. Email Address Enter the user’s email address. Phone Number Enter the user’s phone number. Job Position Select from the drop-down. Title Enter the title of the authorized representative. - Once complete, you can either Save and Return Later or Continue.
Clicking Continue will take you to the Review screen. - Verify that the information on the Review screen is correct by checking the boxes. Use the back button to make any changes.
- After checking the boxes, click Next: Select Phone Number. You can also Save and Return Later.
- On the CosmoLex SMS Phone Number Purchase screen, enter your Area Code and hit Search.
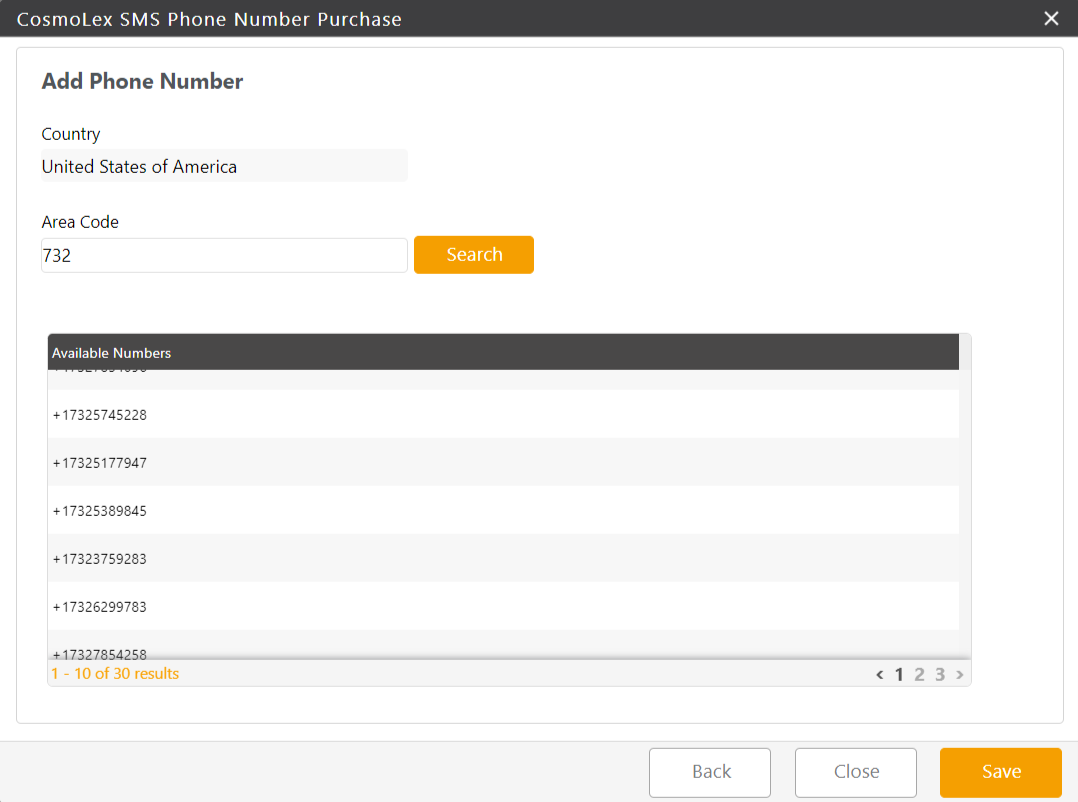
- From the list of available numbers that displays, select your preferred number and click Save. You can scroll through the numbers on each page to select one that you prefer.
- On the Edit Phone Number screen, in the Forward Calls To field, enter a phone number capable of receiving voice calls. Leaving the field blank, will give your caller the following message: The number you are trying to reach does not have call forwarding set up. Disconnecting now.
- After completing the fields, click Submit.
You will be redirected to the SMS Enrollment Summary screen. - If you are satisfied with the information on the Summary screen, click Save. If you wish to make any changes, click Cancel.
Once your application is submitted, it takes about 8 business days for approval. You will receive an email and your dashboard will be updated with the status of your application.
Configuring SMS Within CosmoLex
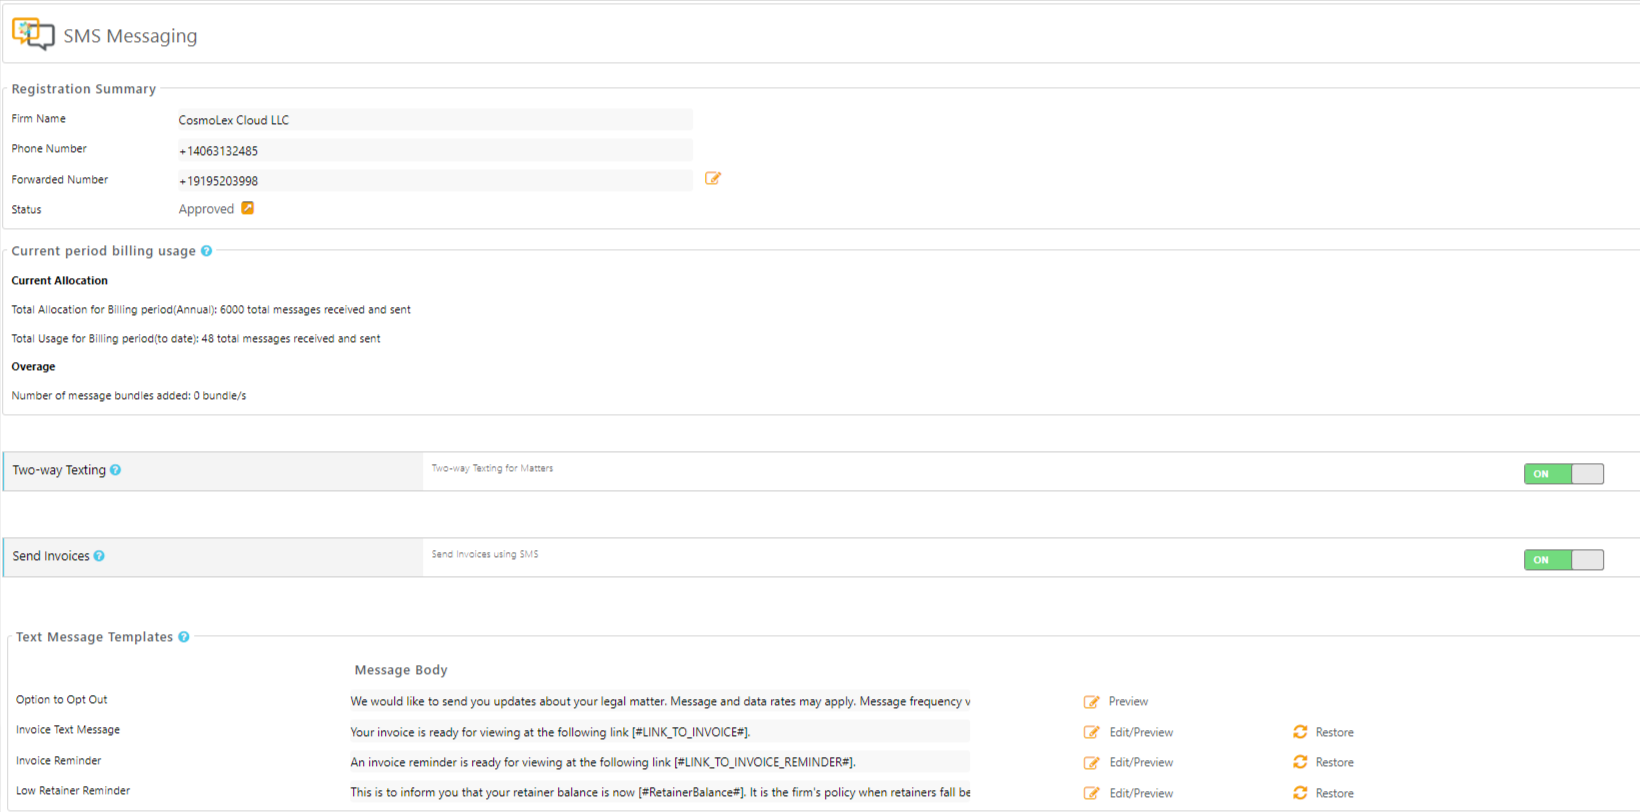
Once you have submitted your application for SMS registration, you can check its status on the SMS Messaging screen and also configure other SMS settings in this area.
- From the bottom of the navigation, click Account.
- From the Account left navigation, click SMS.
SMS Messaging Screen Fields
| Field | Description |
| Registration Summary | |
| Firm Name | Defaults to the firm name entered at the time of registration |
| Phone Number | Defaults to the number you selected during registration |
| Forwarded Number |
|
| Status | Displays the status of your application – Pending Approval, Approved, Failed |
| Current Period Billing Usage | Once you have surpassed your allocated number of messages, an overage bundle of 500 messages is automatically added to your account. Multiple bundles can be added based on your usage. You will be billed for these bundles in your next billing cycle. |
| Current Allocation | Displays your Total Annual Allocation and your Total Usage |
| Overage | Displays the number of overage bundles added, if any. |
| Two-Way Texting |
|
| Send Invoices | Click the toggle button On to send invoices. |
| Text Messaging Templates |
|
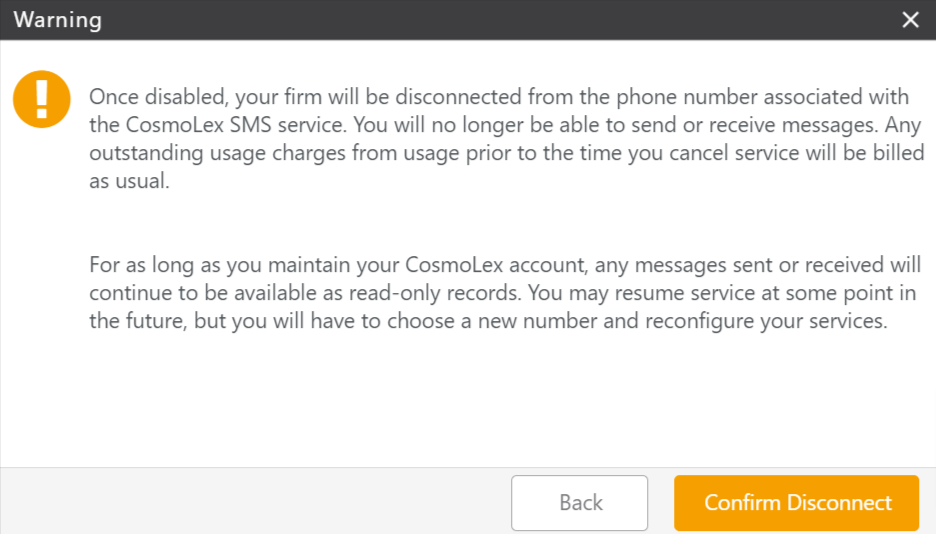
Discontinue Your SMS Subscription
- From the bottom of the navigation, click Account.
- From the Account left navigation, click SMS.
- In the Registration Summary section, click on the details icon next to the status field.
- On the Approval Details screen, click Disconnect Your Number.

- After reading the warning message, if you are certain you wish to discontinue your SMS subscription, click Confirm Disconnect. Your phone number for SMS will be disabled.