You can associate an accounts payable bill with a specific matter for payment at a later date.
Post a New Bill to a Matter
To post a new bill to a matter:
- From the left navigation panel, click Accounting.
- From the bottom of the Accounting left navigation, click Accounts Payable.
- From the toolbar atop the Accounts Payable screen, click Add > Bill.
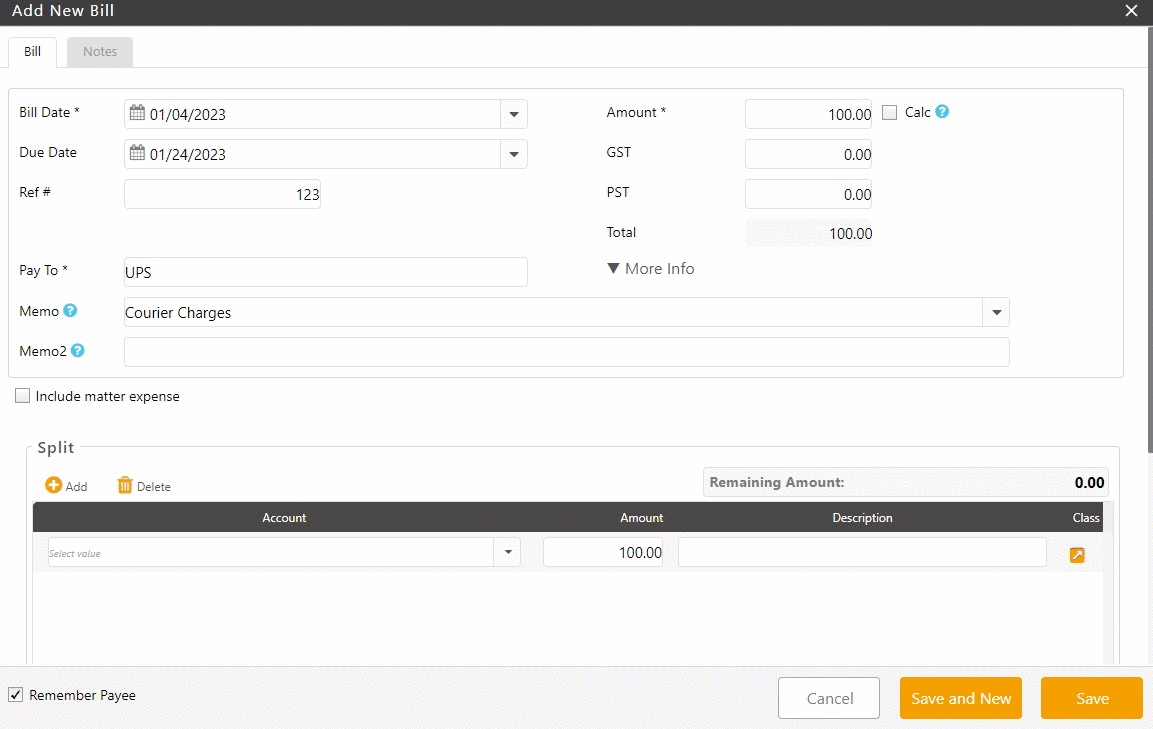
Add New Bill Screen FieldsBill Date From the drop-down, click the bill date. Amount Enter the bill amount. Calc For the Calc check box, take your preferred action: - Check Calc Box
In the Total field, enter the total amount.
The system calculates taxes based on your firm’s default rates and auto-populates the fields.
- Uncheck Calc Box
In the GST, HST, QST and PST fields, as applicable, enter the taxes paid.
The Total field auto-populates with the bill’s total.
Ref # Add a reference number, if desired. It can be an internal tracking number, or one from the bill. Pay To Enter the name of the entity to whom you are paying. More Info Click to add payee’s mailing address, if needed. Memo Use the drop-down to select a memo, or type in the field. Memo2 Enter another memo if you desire further detail. This will not display when you print checks. Include Matter Expense Check the box if you wish to include this AP bill as a matter expense. Options - Discount for early payments – System will add a flag for bill as discount. Discount is not applied automatically. User can filter bills using Discount for early Payments
- Finance charge for late payments – System will add a flag for bill as Finance charge for late payments. Finance charge is not applied automatically. User can filter bills using Finance charge for late payments.
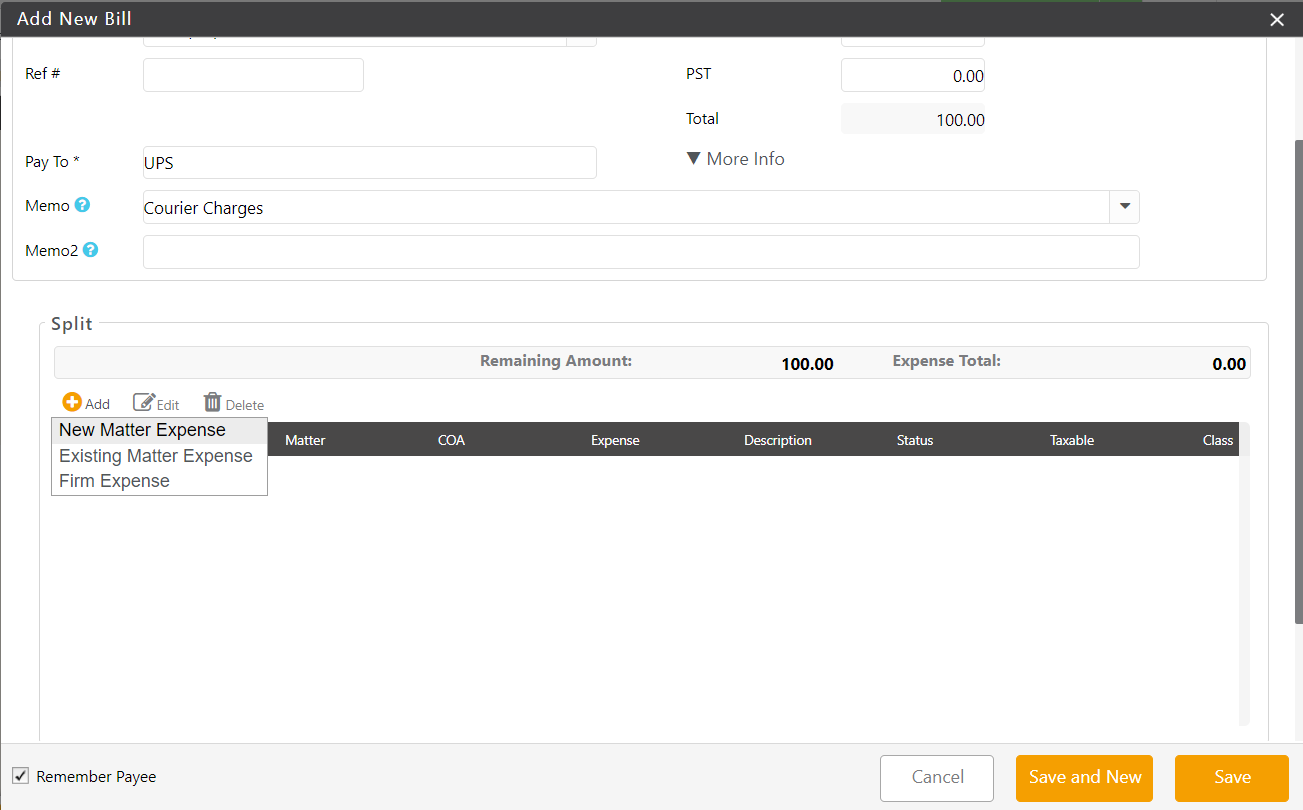
Split Section
The section displays your remaining amount and expense total with the option to split the accounts payable bill between New Matter Expense, Existing Matter Expense, and Firm Expense.
To add an item:
- From the tabs atop the split section, select Add.
- From the drop-down, take the appropriate action:
-
- Select New Matter Expense if you want to create new expense in a matter.
- Select Existing Matter Expense if you want to link existing soft cost to the transaction.
- Select Firm Expense if the firm is covering a portion of this expense.

New Matter Expense
Selecting New Matter Expense will automatically open an Expense Card.
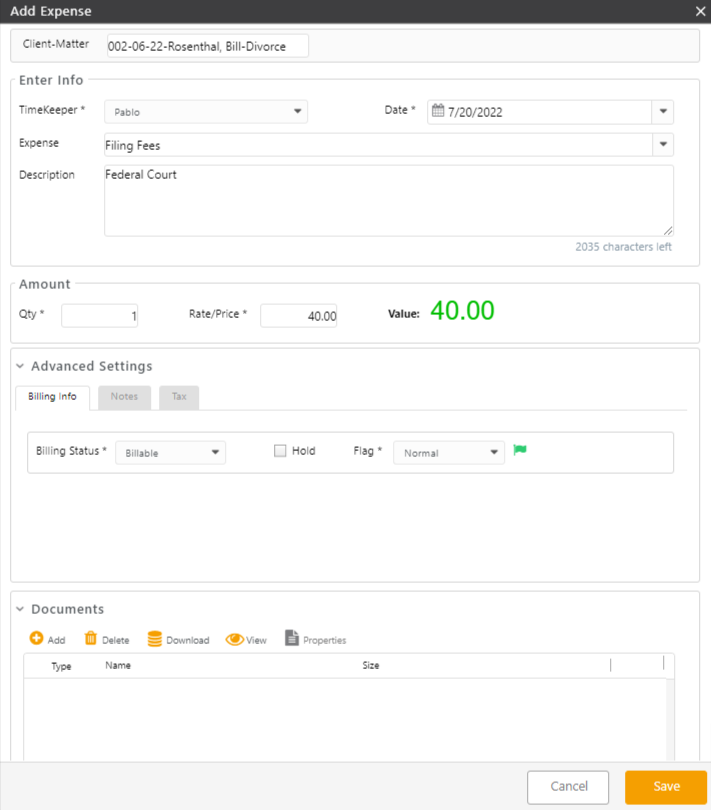
Client – Matter - Enter the first few characters of the client or matter name.
The field populates with a drop-down of potential matches. - Click the appropriate matter.
Disbursement Incurred as an Agent* - (*Canada Only) Check or uncheck the Disbursement Incurred as Agent box.
Timekeeper - Use the drop-down to click a timekeeper. You can set a default timekeeper.
Expense - Use the drop-down to click an expense. You can customize your list items.
Description - Enter your desired description, if applicable. You can set default descriptions when customizing your list items and create shorthand descriptions for quick, easy entry.
Amount Qty The number of expenses you wish to add Rate/Price The cost of each expense Value Calculated by the system based on the Qty and Rate/Price you entered Advanced Settings Section Billing Info Tab Billing Status - Use the drop-down to click a billing status.
Billable - Default option
- The system includes it in the unbilled balance and displays it on your next invoice.
No Charge - Items you are completing free of charge but want to display on the invoice. For example, Value: $200 Charge: $0.00.
Non-Billable - Items you want to track for internal rather than billing reasons
- Not listed on the invoice
Hold - Check or uncheck the box.
Flag - Select from Critical, Low Priority, or Normal.
Notes Tab - Add any notes that you wish to. These are for internal use only. However, they will be included in CSV and Excel export.
Tax Tab
Taxable Unchecked - If this setting is unchecked, no tax will apply to this entry.
Checked - The tax rate fields display your firm’s default settings. If yours is a Canadian firm or a US firm in a state that applies tax to expenses, you can use the automated tax calculation feature. You can also override these settings.
Documents Section
Add and manage documents associated with the expense.
Documents You can add, delete, download, and view documents or check document properties. Existing Matter Expense
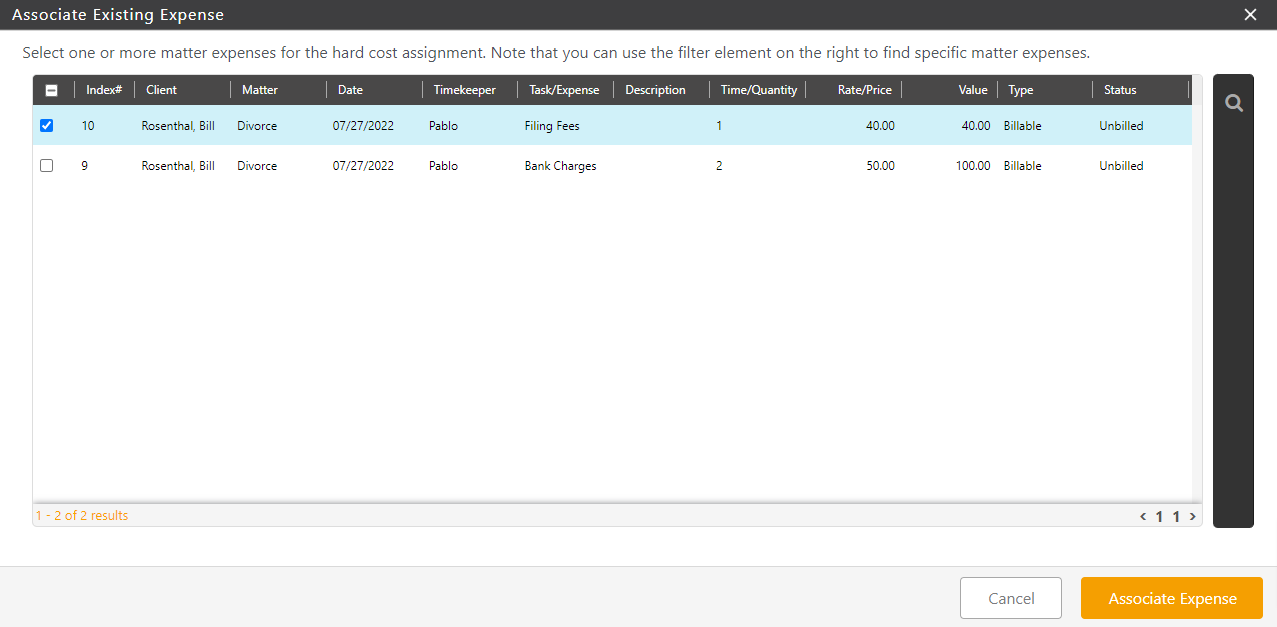
- Clicking on Existing Matter Expense will take you to the Associate Existing Expense screen. The screen lists all your matter expenses.
- If you wish to find specific matter expenses, you can use the filter on the right.
- Check the box beside the matter expense(s) which you would like to associate with this transaction.
- Click Associate Expense in the lower right corner.
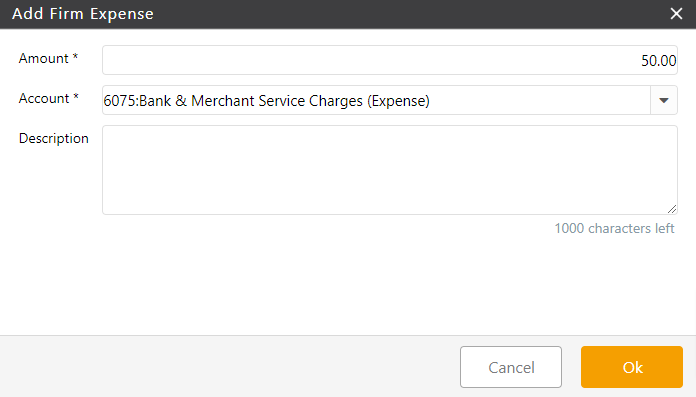
Firm Expense
You can choose to add this transaction to you firm’s expenses. Complete the fields on the Add Firm Expense screen.
Amount - You can enter a part of the transaction or all of it.
Account - Use the drop-down to choose the account to which you wish to add this firm expense.
Description - Enter your desired description, if applicable. You can set default descriptions when customizing your list items and create shorthand descriptions for quick, easy entry.
Save Options
Save and New - Click Save and New to save the expense and enter another hard cost right away. Helpful for bulk entry.
Save - Click Save to save the expense and return to the Matters screen.
- In the lower left corner, check the Remember Payee box to add them to your Payees list, if desired.

- Check Calc Box
Post an Existing Bill to a Matter
To post an existing bill to a matter:
- From the left navigation panel, click Accounting.
- From the bottom of the Accounting left navigation, click Accounts Payable.
- On the Accounts Payable screen, double-click the bill, or single-click it to highlight it, and then from the toolbar, click Edit.
- On the Edit Bill screen, toward the lower left of the screen, check the box to Post as matter expense.
The section expands. - In the Matter field, enter the first few characters of the matter name.
A drop-down list displays potential matches. - Click the appropriate matter.
- Click the radio button for New expense card.
- From the Expense field’s drop-down, click the expense.
- From the Timekeeper field’s drop-down, click the timekeeper.
- From the Billing Status field’s drop-down, click Billable.
- In the Description field, enter a description.
- In the lower right corner, click Save.
The system posts your bill as a matter expense and displays a dollar sign icon to its far left.
Once a bill is posted to a matter, it creates a hard cost. To learn more about hard costs, click here.