You can manage your accounts payable credits to ensure proper application to future payables.
Watch a Video
Enter an Accounts Payable Credit
To enter an accounts payable credit:
- From the left navigation panel, click Accounting.
- From the bottom of the Accounting left navigation, click Accounts Payable.
- From the toolbar atop the Accounts Payable screen, click Add > Credit.
- On the Add Credit screen, from the Date field’s drop-down, click the credit date.
- In the Amount field, enter the credit amount.
- In the Ref #, enter a reference number, if desired.
- In the Vendor field, enter the vendor’s name.
- From the Memo field’s drop-down, click the transaction reason. You can enter a new reason instead of using the drop-down choices. You can also customize your drop-down choices.
- From the Account field’s drop-down, click the account to which you want to post this vendor’s credits.
- In the lower right corner, take the appropriate action:
- Click Save and New to save this credit and add another.
- Click Save to save this credit and return to the Accounts Payable screen.
The system saves your credit and proceeds as applicable.
Apply an Accounts Payable Credit
To apply an Accounts Payable credit:
- From the left navigation panel, click Accounting.
- From the bottom of the Accounting left navigation, click Accounts Payable.
- On the Accounts Payable screen, check the boxes beside the applicable vendor’s credit and bill.
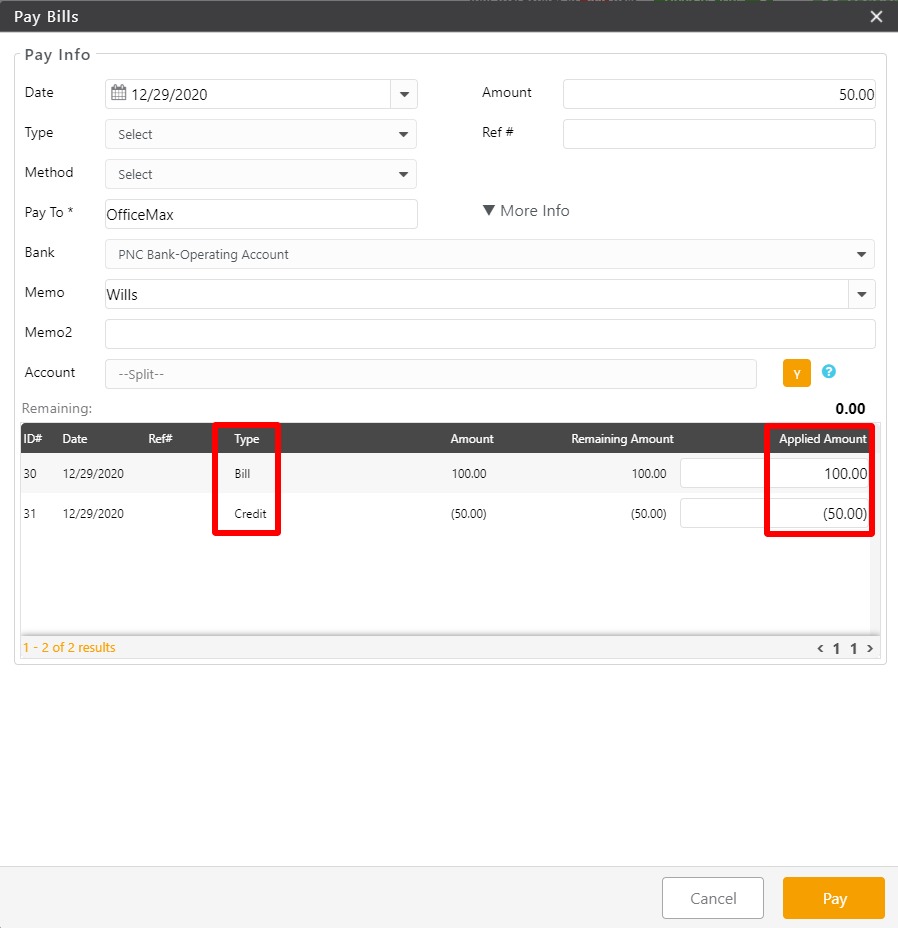
- From the toolbar, click Pay.
The Pay Bill screen opens. The Amount field populates based on the system’s calculated total of the selected credits and bills. The Pay To field populates with the vendor’s name. The Account field reflects the split payment. - From the Date field’s drop-down, click the payment date.
- In the Ref #, enter a reference number, if desired.
- From the Type field’s drop-down, click the payment type.
- From the Method field’s drop-down, click the payment method.
- From the Memo field’s drop-down, click the transaction reason. You can enter a new reason instead of using the drop-down choices. You can also customize your drop-down choices.
- In the lower right corner, click Pay.
The system applies the appropriate credits and payments as applicable.
Important to Know
The Applied Amount column displays credits and bills as separate line items. The system applies credits based on these criteria.
| Credit Amount = Bill Amount |
|
|---|---|
| Credit Amount < Bill Amount |
|
| Credit Amount > Bill Amount |
|