The Accounting area’s Bank section allows you to track your firm’s transactions and to perform banking related functions.
Watch a Video
Add a Bank
To add a bank:
- From the left navigation panel, click Accounting.
- From the Accounting left navigation, click Bank.
- From the toolbar atop the Bank screen, click Add.
- On the Add Bank screen, in the Account Type field, click the radio button for Operating, Trust, or Credit Card Account.
- Complete the remaining fields.
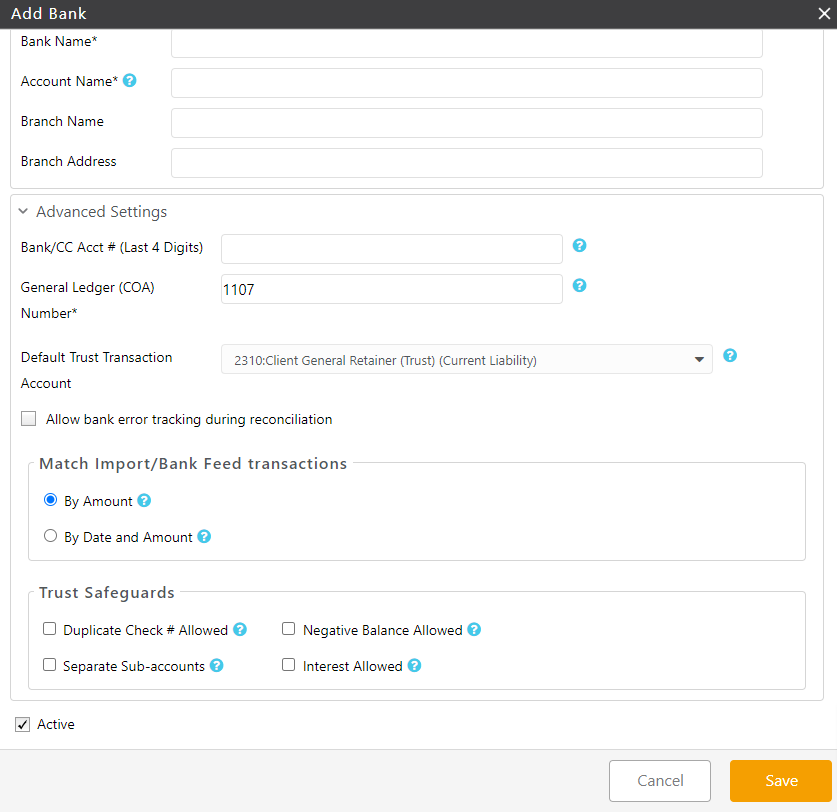
Bank Name Enter the name of your bank. Account Name Enter the account name, such as John Doe Attorney Account. Account names must be unique. Branch Name Enter the branch name. Branch Address Enter the branch address. Advanced Settings Section
Bank/CC Acct # (Last 4 Digits) Enter the last four digits of your account number. This is for your internal reference. General Ledger (COA) Number Enter the bank’s four-digit number. This is only for accounting purposes. Default Trust Transaction Account - This will display if you have selected Trust as your Account Type.
- From the drop-down select the Trust Transaction Account you wish to make your default.
Allow bank error tracking during reconciliation Check the box to allow bank error tracking. This will help you track bank errors when reconciling your account. For additional information, see Recording Bank Errors.
Match Import/Bank Feed Transactions Section
By Amount Check the box to include transactions with the same amount but different date, with same date/amount, with ref# and amount for withdrawal type and check as method with bank feed/import transaction in match detail screen. By Date and Amount Check the box to include existing transaction in the date and amount and/or ref# and amount for withdrawal type and check as method with bank feed/import transaction in match details screen. Trust Safeguards Section (For Trust Bank Only)
Duplicate Check # Allowed Check the box to allow duplicate check entry. Overrides built-in trust accounting safeguards. Negative Balance Allowed Check the box to allow a negative balance in your trust account. Overrides built-in trust accounting safeguards. Separate Sub Accounts Check the box if your bank assigns a separate sub account number to each client. Interest Allowed Check the box if your bank credits interest in trust accounts and it is shown on bank statements. - In the lower right corner, click Save.
The system saves your new bank.
Edit a Bank
To add a bank:
- From the left navigation panel, click Accounting.
- From the Accounting left navigation, click Bank.
- On the Bank screen, single-click the bank to highlight it.
- From the toolbar, click Edit.
- On the Edit Bank screen, make your edits.
- In the lower right corner, click Save.
The system saves your edits.
Deactivate a Bank
To deactivate a bank:
- From the left navigation panel, click Accounting.
- From the Accounting left navigation, click Bank.
- On the Bank screen, single-click the bank to highlight it.
- From the toolbar, click Edit.
- On the Edit Bank screen, toward the lower left of the screen, uncheck the Active box.
- In the lower right corner, click Save.
The system deactivates the bank account.
Delete a Bank
To delete a bank:
- From the left navigation panel, click Accounting.
- From the Accounting left navigation, click Bank.
- On the Bank screen, single-click the bank to highlight it.
- From the toolbar, click Delete.
The Delete Bank message box reads: Are you sure you want to delete selected Bank? - Click Yes.
The system deletes the bank.