You can invite clients to the client portal to view and share items or revoke their access.
Invite a Client
To invite a client to access the client portal:
- From the left navigation panel, click Matters.
- On the Matters screen, either double-click the matter, or single-click it, and then from the toolbar, click Details.
- From the Matter Details left navigation, click Client Portal.
- On the Client Portal screen, in the upper right corner, click the gray OFF switch.
The switch turns ON and green. - In the Contacts section, click Invite Contact.
The Client Portal Access screen opens, displaying the client’s name and email address. - If the email field is empty, enter the client’s email.
- Click Invite.
The system saves the client’s primary email address and sends them an invitation with instructions for creating a client portal account.
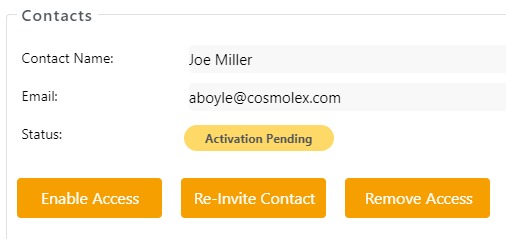
Once you invite a client to access the portal, the Client Portal tab displays three buttons under the Contacts section:
Disable Client Access
To temporarily disable a client’s portal access:
- From the left navigation panel, click Matters.
- On the Matters screen, either double-click the matter, or single-click it, and then from the toolbar, click Details.
- From the Matter Details left navigation, click Client Portal.
- On the Client Portal screen, in the Contacts section, click Disable Access.
The Disable Access message box reads: Client portal account access has been disabled.
Re-Invite Contact
To re-invite a client to the client portal:
- From the left navigation panel, click Matters.
- On the Matters screen, either double-click the matter, or single-click it, and then from the toolbar, click Details.
- From the Matter Details left navigation, click Client Portal.
- On the Client Portal screen, in the Contacts section, click Invite Contact.
The system saves the client’s primary email address and sends them an invitation with instructions for creating a client portal account.
Remove Client Access
To remove a client’s portal access:
- From the left navigation panel, click Matters.
- On the Matters screen, either double-click the matter, or single-click it, and then from the toolbar, click Details.
- From the Matter Details left navigation, click Client Portal.
- On the Client Portal screen, in the Contacts section, click Remove Access.
The Remove Client Access message box reads: Removing access will prevent this contact from accessing their client portal. All shared items will remain shared in the portal should you choose to enable access in the future. Are you sure you want to remove the access for this client? - Click Yes.
The system removes access, displaying only the Invite Contact button in the Contacts section.